
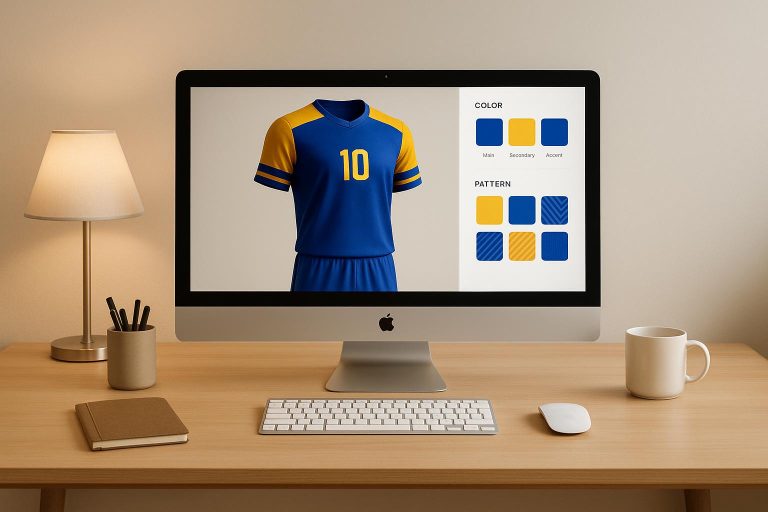
3D uniform previews let you see exactly how your custom team uniforms will look before production. These interactive digital models allow you to rotate, zoom, and inspect every detail in real-time. You can adjust colors, logos, and text while instantly seeing changes on a virtual uniform. This eliminates design guesswork, reduces errors, and speeds up the approval process. Here’s a quick overview of how it works:
- Customization: Upload logos, names, and numbers, then tweak colors, fonts, and design elements.
- Interactive Model: Use a 360° view to inspect all angles, ensuring accuracy and alignment.
- Error Prevention: Spot issues like misspelled names or misplaced logos early.
- Streamlined Process: Make edits directly in the platform and finalize designs faster.
Wooter Apparel integrates this feature into their ordering system, so teams can design uniforms without needing special skills or software. The result? Uniforms that match your vision, delivered with precision and no surprises.
3D Design Studio for Sports Apparel & Uniform | Jersey Design Software for Web2Print eCommerce Store
Step-by-Step Guide to Creating 3D Uniform Previews
Designing custom team uniforms with Wooter Apparel’s 3D preview system is simple and interactive. The platform walks you through the entire process, allowing you to see your design come to life in real time. Here’s how it works:
Step 1: Choose Your Sport and Uniform Type
Begin by selecting your sport and its specific uniform template. Each sport has its own section with tailored options to ensure the designs match the needs of that game.
Once you’ve picked a sport, choose the type of uniform piece you’d like to design. Options include jerseys, shorts, warmup jackets, and accessories, each with their own pricing clearly displayed. When you make a selection, the platform automatically loads a 3D model template that matches the chosen garment, giving you an accurate preview of the design. After this, you’ll move on to uploading your team details.
Step 2: Upload Logos, Names, and Numbers
This step is all about personalizing your uniform. Upload high-resolution images of your team logos and decide where each logo should appear – on the chest, sleeves, back, or other areas. If needed, you can upload different variations of a logo, such as a full-color version for the chest and a simplified one for smaller placements.
For player names and numbers, you can either enter them one by one or upload an entire roster list. The system supports all numbering formats, and names will appear exactly as you type them, so double-check for accuracy. You can also include sponsor logos, league patches, or any other branding elements to further customize the design.
Step 3: Customize Colors, Fonts, and Design Elements
Now it’s time to make the uniform truly yours. Customize colors for every section of the uniform – body panels, trim, sleeves, collar, and side panels can all be tailored to match your team’s color scheme.
Choose fonts for player names, numbers, and any text elements. The platform offers a variety of athletic font styles that are easy to read and look professional. You’ll see how the text appears in real time, ensuring it fits your vision.
Add design elements like accent stripes, panel patterns, or decorative details to make your uniforms stand out. These elements can either match your team colors or create contrast for added visual impact. The fully sublimated printing process ensures durable, seamless designs.
Step 4: Use the 3D Model
The interactive 3D model is where your design truly comes to life. Rotate the model 360° to inspect every angle, and use the zoom feature to check details like logo clarity, text alignment, and smooth color transitions.
The model updates instantly with any changes you make. Adjust a color or move a logo, and you’ll see the changes in real time. This feature takes the guesswork out of the process, letting you fine-tune every detail to perfection.
You can also switch between different viewing modes to see how the uniform looks under various lighting conditions or against different backgrounds. This helps you ensure the design maintains balance and looks professional in any setting.
Step 5: Make Adjustments and Finalize the Design
Once your design is live on the 3D model, it’s time for final adjustments. Refine details like logo sizes, color tones, and text placements. Save your progress and review the design summary before giving final approval.
The platform automatically saves your work, so you can return to it later if needed. This feature is especially useful for teams that require input from multiple people before finalizing the design.
The finalized 3D preview becomes the blueprint for manufacturing, ensuring that the uniforms you receive match exactly what you created on screen.
Features and Benefits of 3D Uniform Previews
Key Features of 3D Previews
Wooter Apparel’s 3D uniform preview system takes the guesswork out of uniform design by offering highly realistic visualizations. From the way the fabric drapes to the blending of colors and precise branding details, this tool provides an accurate digital representation of the final product before production even begins. Teams can see how their uniforms will look in real-life conditions, eliminating surprises.
One standout feature is the interactive 360° rotation. Unlike flat 2D mockups, this allows teams to view their uniforms from every angle, revealing details that traditional methods often miss.
Another game-changer is real-time updates. Every time you tweak a color, reposition a logo, or adjust a font, the 3D model updates instantly to reflect those changes. This immediate feedback simplifies the design process, cutting down on back-and-forth communications.
The system also goes a step further by simulating fit, movement, and layering. Teams can see how jerseys move during play and how additional pieces like warmup jackets work with the main uniform.
Once the design is finalized, production-ready files are automatically generated. This ensures that the manufacturing process aligns perfectly with the approved digital design, making what you see in the preview exactly what you’ll get in production.
These features allow teams to fine-tune their designs with precision, leaving no detail overlooked.
How Teams Benefit from 3D Previews
This system eliminates the need to rely on flat sketches or verbal descriptions. Instead, teams can see a realistic 3D representation of their uniforms, which builds confidence in design decisions right from the start. These clear visuals make it easier to streamline decision-making across all roles, from players to coaches to administrators.
With a clear view of the final product, decision-making and approval times are significantly faster. Coaches, team managers, and stakeholders can quickly assess the design and provide feedback, turning what could be a weeks-long process into just a few days.
The process also saves both time and money. By minimizing the need for physical prototypes and reducing production errors, the 3D preview ensures that the manufacturing workflow matches the approved design exactly. This means fewer mistakes, fewer delays, and a smoother overall process.
Collaboration is another major advantage. The 3D model can be shared among multiple stakeholders at once, making it easier for everyone – coaches, players, and administrators – to provide input before the design is finalized. This ensures the final product reflects the vision of the entire team.
Ultimately, teams experience greater satisfaction with their uniforms because they know exactly what to expect when they step onto the field.
sbb-itb-4d95ad3
3D Previews vs. Traditional Design Methods
When comparing 3D previews to older 2D design methods, the differences are striking. While both approaches aim to showcase uniform designs, 3D previews go far beyond static images, offering dynamic, full-scale visualizations that show exactly how a team’s uniform will look and perform on the field.
Traditional 2D mockups are limited to flat, single-view images, often missing critical details like fabric texture and seam curvature. Typically, they only provide a front-facing perspective, leaving out how logos wrap around curved seams or how colors interact on textured materials.
On the other hand, 3D uniform previews present garments as fully dimensional objects, complete with realistic lighting, fabric movement, and detailed angles. This technology brings graphic details to life – textures, seams, and even stitches are visible. It also allows users to see how fabric folds impact artwork placement and how different materials reflect light. With interactive features like spinning, zooming, and direct in-browser editing, 3D previews give users total control to inspect every aspect of the design.
Comparison: 3D Previews vs. 2D Mockups
| Feature | 3D Uniform Previews | Traditional 2D Mockups |
|---|---|---|
| Visualization Quality | Realistic, fully dimensional views with lighting, fabric draping, and structural details. | Flat, front-facing images with limited depth and no simulation of fabric interaction. |
| Customization Flexibility | Interactive tools for spinning, zooming, and editing designs in real time. Visualizes scalable artwork and decoration techniques. | Static angles make it challenging to assess designs on curves or different textures. |
| Error Reduction | Reduces production errors with photorealistic clarity in fit, drape, and scale. | Higher risk of errors due to incomplete representation of design details. |
| Approval Speed | Speeds up approvals by reducing surprises and revision cycles. | Slower approvals due to limited visualization and potential misunderstandings. |
| Customer Confidence | Builds trust with realistic textures, shadows, and angles, boosting conversion rates. | Basic visuals may lead to hesitations and lower confidence in purchase decisions. |
One standout advantage of 3D previews is their ability to handle scalable artwork sizing. Designers can seamlessly adjust graphics across all garment sizes – from XS to 4XL – and immediately see how proportions and placements shift. This ensures consistency and precision, saving time and effort.
3D previews also excel in showcasing different decoration techniques. Whether it’s plastisol, puff ink, or gloss ink, the technology accurately depicts how each finish will look on the garment. This level of detail empowers teams to make informed decisions about textures and finishes before production begins.
Perhaps the most impactful benefit of 3D previews is their ability to reduce returns and customer dissatisfaction. By providing photorealistic clarity of drape, fit, and scale – based on actual apparel patterns – they bridge the gap between digital designs and the final product. Unlike traditional mockups, they give teams and customers confidence, ensuring faster approvals and more reliable outcomes.
Finalizing and Approving Your 3D Uniform Design
After exploring every detail of your uniform design with 3D preview technology, it’s time to move into the final approval phase. This step ensures your uniforms align perfectly with your vision, leaving no room for unexpected surprises. Here’s how to make sure everything is spot on.
Review the Design for Accuracy
Take a close look at player names and numbers using the 3D rotation tool. Double-check spelling, font consistency, and placement from every angle. The 3D preview also lets you assess color accuracy under different lighting conditions and textures, ensuring your team’s colors stay true to your brand guidelines.
Zoom in to inspect how your logo appears on curved seams or fabric areas. This helps you identify and fix any potential distortions before production begins. Pay attention to design elements like stripes, patterns, and accent colors, reviewing how these flow across the uniform, even in areas that might be hidden in traditional flat mockups. This way, you can catch and correct any inconsistencies that could affect the final look.
Confirm Sizing and Order Details
Once you’re confident in the design, move on to verifying sizing and order details. Confirm that all sizes align with US standards and check how your design scales across sizes, from XS to 4XL. Ensure logos and text remain proportional and readable for every size on your team roster.
Carefully review your order quantities and consider adding a few extra uniforms in common sizes to accommodate future team changes or replacements. Delivery timelines are provided in the standard US date format (MM/DD/YYYY), so you can plan ahead for games or events. Keep in mind that Wooter Apparel’s production process accounts for fully sublimated designs, so factor in these timeframes when scheduling.
Don’t forget to confirm any accessories or warmup gear that match your uniforms. The 3D preview allows you to see how these pieces complement your main design, ensuring a polished and cohesive team look.
Approve the Design and Place the Order
The final approval step captures every adjustment you’ve made during the design process. Take one last, thorough review of your 3D design, looking at every detail to make sure it’s exactly as you want it. Make any final tweaks before giving the green light.
Once you’re satisfied, digitally approve the design to create a permanent record. Complete the payment securely in US dollars, and you’ll receive a detailed order confirmation. This includes all design specs, production timelines, and tracking information, which you can reference throughout the process.
You’ll also get regular updates on your order’s progress, helping you plan team fittings and organize uniform distribution before your first game or event. Thanks to the precision of the 3D preview and a smooth approval process, you can move forward with confidence, knowing your team’s uniforms will look exactly as envisioned.
Why 3D Uniform Previews Matter
3D previews have revolutionized the way custom uniforms are designed, offering a level of precision and confidence that traditional methods just can’t match. By replacing uncertainty with clarity, this technology ensures teams know exactly what to expect before production begins.
Key Benefits of 3D Previews
Accurate visualization lets teams see their uniforms from every angle, capturing details that flat mockups often miss. From how logos wrap around seams to how colors interact with fabric textures, nothing is left to guesswork.
Fewer errors mean big savings. Spelling mistakes, sizing issues, and design inconsistencies are caught early, cutting down on costly revisions and wasted time.
Real-time customization makes adjustments effortless. Whether it’s adding player names, tweaking patterns, or changing colors, teams can see the results instantly in a 3D view.
Streamlined collaboration ensures everyone is on the same page. Coaches, players, and administrators can review the same 3D model, making it easier to gather feedback and finalize decisions together.
How Wooter Apparel Simplifies the Process
Wooter Apparel takes these benefits further by offering a platform that’s easy to use, even for those with no design experience. Teams can upload logos, pick colors, and customize text using simple drag-and-drop tools.
Fast design approval speeds things up. With 3D previews, teams can finalize their uniforms quickly, allowing production to start without delays caused by revisions.
Quality you can trust. The 3D previews show exactly how designs will look on real fabric, from color blending to the sharpness of graphics on curved surfaces. This ensures the final product matches expectations.
Transparent pricing eliminates surprises. Teams can see the cost upfront – ranging from $16.99 for jerseys to $199.99 for full packages – making budgeting straightforward. And thanks to the accuracy of 3D previews, there are no surprises when the uniforms arrive.
FAQs
How does the 3D uniform preview system help ensure accurate designs?
The 3D uniform preview system offers a lifelike, interactive look at your custom uniform design before it goes into production. This tool makes it easy to identify and address any issues with colors, patterns, logos, or other details early on.
By spotting errors ahead of time, you can avoid expensive revisions and ensure the final product aligns perfectly with your vision. It’s an efficient way to streamline the design process and create a uniform that meets your expectations.
Can I see how my custom uniforms will look in different lighting using the 3D preview?
The 3D preview feature lets you see your custom uniform designs in detail before finalizing your order. Although it may not specifically simulate different lighting conditions, many advanced 3D tools factor in lighting to provide accurate color and material representation. If viewing your design under particular lighting is important, it’s a good idea to contact support to clarify the feature’s capabilities.
How do I finalize and approve a 3D uniform design before placing an order?
Finalizing and approving a 3D uniform design is straightforward. It starts with creating a detailed 3D mockup of the uniform. This digital preview highlights the exact colors, textures, and fit, giving you a clear idea of how the final product will look. You can review every detail and request adjustments as needed.
Once you’re happy with the design, you can give the green light for production. This step ensures everything matches your expectations before manufacturing begins, streamlining the process and eliminating the need for physical samples or repeated revisions. It’s an efficient way to turn your custom uniform ideas into reality!