
When designing uniforms, the placement of team and sponsor logos is essential to balance branding and visibility. Team logos typically take center stage, representing the team’s identity, while sponsor logos are secondary but strategically positioned to maximize exposure. Here’s a quick breakdown:
- Team Logos: Usually placed on the left chest, center front, or upper back. These are larger, adjusted for uniform size, and serve as the primary visual element.
- Sponsor Logos: Positioned on sleeves, shoulders, or lower panels. These are smaller and designed to complement the team logo without overshadowing it.
Key Considerations:
- Maintain clear spacing between logos.
- Adjust sizes for readability across uniform types.
- Follow league rules for logo placement and dimensions.
Proper placement ensures the team’s identity remains prominent while giving sponsors the visibility they need. For compliance and design support, consult custom football uniform manufacturers with expertise in sports branding.
Where to Place Team Logos
Positioning team logos thoughtfully on uniforms is key to maintaining a strong, unified team identity while keeping them visually distinct from sponsor elements. The right placement ensures logos are both functional and highly visible for fans, cameras, and photos. Let’s look at the most effective spots for team logos across different parts of a uniform.
Center Front Placement
The center front chest is the prime location for team logos, grabbing attention instantly. On basketball jerseys, for example, the logo is typically placed front and center, either above or below the player’s number. This ensures it stands out during gameplay, broadcasts, and fan photos.
For standard positioning, the logo is centered between the collar and sleeve seams, with dimensions adjusted to the uniform type. On sleeveless jerseys, the design is often rectangular, covering up to 4.7 square inches (30 cm²) or featuring letters up to 4 inches tall. This placement creates a bold, unmistakable brand statement, visible from nearly every angle.
Upper Back Placement
The upper back is another excellent spot, often used for team names or secondary logos. Positioned 5–9 inches below the collar and centered between the shoulder seams, this placement ensures clear visibility from behind – especially important in sports like football and basketball where players are frequently viewed from the back.
Logos here are typically about 12 inches wide and 4–5 inches tall, making them easy to read on hoodies, jackets, or jerseys. This area supports a layered branding approach by complementing the front logo and enhancing the overall uniform design. For best results, avoid placing logos over seams, as this can distort the design.
Sleeves and Side Panels
Sleeves and side panels offer additional opportunities for branding. Sleeve logos are popular secondary elements, often placed 1–2 inches above the sleeve hem or positioned 3–4 inches wide along the outer arm. This placement works well in sports like basketball, baseball, and soccer, where arm movement keeps these logos visible without overshadowing the main chest logo. In baseball, sleeve logos often pair with left chest designs for a balanced look.
Side panels, while less common, can add subtle branding. These logos are usually small – between 1 and 4 inches – to prevent distortion during gameplay. If you’re designing custom uniforms, consult with manufacturers like Wooter Apparel to ensure sleeve and side panel logos meet your sport’s specific needs.
sbb-itb-4d95ad3
Where to Place Sponsor Logos
Sponsor logos need thoughtful placement to ensure they stand out while complementing the team’s branding. The idea is to create a polished design that highlights the sponsors without making the uniform look cluttered. Below are some key areas that offer high visibility and maintain a professional balance.
Front Jersey Panels
The front of the jersey is prime real estate for sponsor logos but requires careful alignment with the team’s branding. Position sponsor logos below the team logo on the chest to establish a clear visual hierarchy – team identity first, sponsor second. This approach preserves the team’s image while giving sponsors prominent exposure. Make sure logos are sized appropriately to be noticeable but not overpowering, and always adhere to league regulations regarding dimensions for placements.
Sleeves and Shoulders
Sleeves and shoulders are ideal for sponsor visibility, especially in action shots and televised games. For example, in basketball jerseys, the top left or right shoulder is a common spot for sponsor logos. This placement draws attention without interfering with the team logo on the chest. It mirrors the strategic layout used for team branding, ensuring all elements work together seamlessly.
Back and Lower Panels
The back and lower panels offer additional space, particularly for secondary or smaller sponsors. The upper back, positioned about 4 inches below the collar, is perfect for larger logos on full-sleeve jerseys. Smaller logos can be placed on the lower back hem or side panels, with dimensions up to 12 inches wide and positioned 5–9 inches below the collar or near the bottom edge. To maintain a clean look, organize logos by size – place larger ones higher up and smaller ones toward the bottom. If you’re working with multiple sponsors, companies like Wooter Apparel can assist in designing uniforms that balance aesthetics with contractual obligations.
Team Logos vs. Sponsor Logos: Direct Comparison
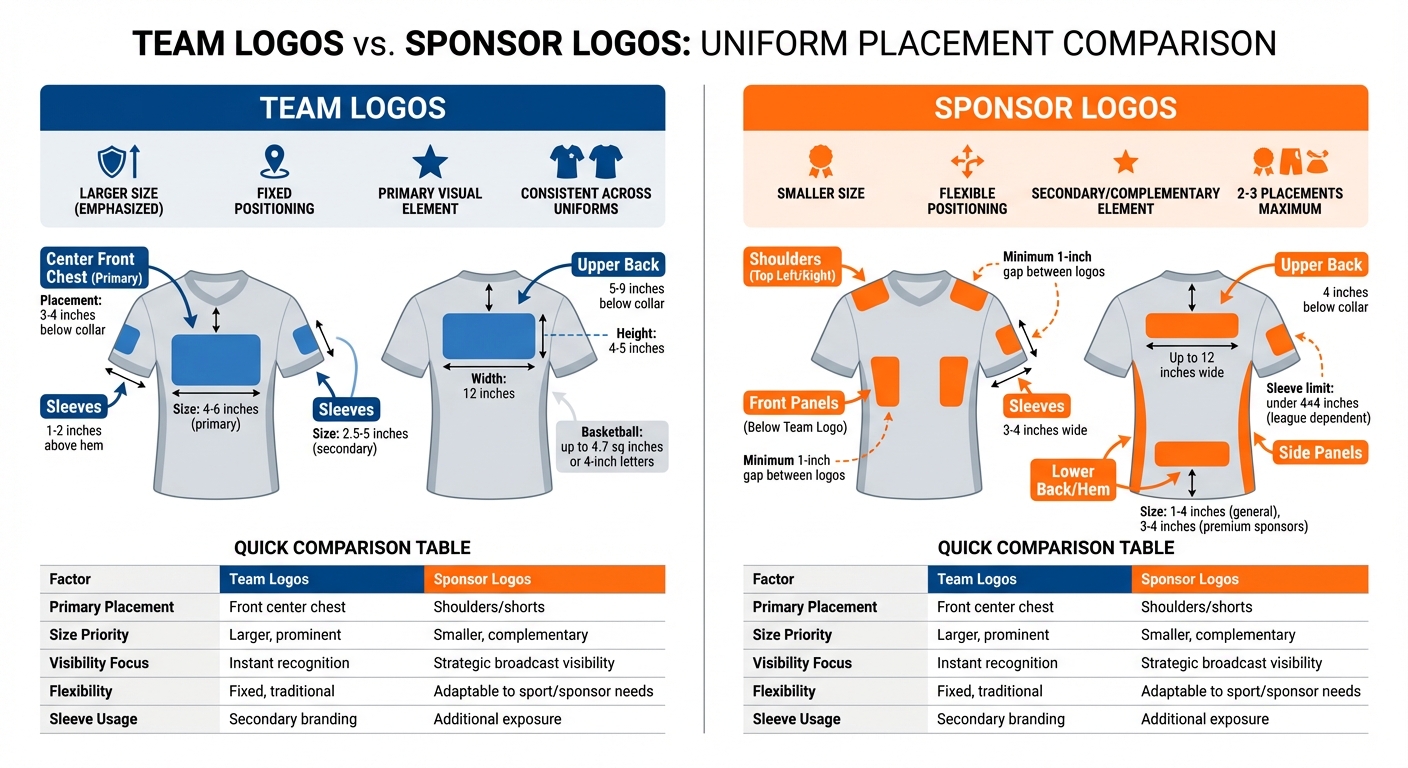
Team Logo vs Sponsor Logo Placement Guide for Sports Uniforms
Balancing team and sponsor logo placements ensures both the team’s identity and sponsorship commitments are respected. Team logos typically stick to traditional, consistent spots, while sponsor logos are positioned to maximize visibility during games and broadcasts. Below is a table that highlights key differences in placement, size, and visibility between the two.
Logo Placement Comparison
This table breaks down how team and sponsor logos differ across several factors, such as placement, size emphasis, visibility, flexibility, and sleeve usage. These distinctions help maintain a design that serves both branding and sponsorship goals.
| Factor | Team Logos | Sponsor Logos |
|---|---|---|
| Primary Placement | Front center chest (above or below the player number), consistent across uniforms | Typically placed on shoulders or shorts, depending on the sport |
| Size Priority | Larger and more prominent to represent team identity | Smaller, designed to complement team branding without overshadowing it |
| Visibility Focus | Ensures instant recognition with consistent positioning | Strategically placed for high visibility during gameplay and broadcasts |
| Placement Flexibility | Fixed positions adhering to traditional and league standards | More adaptable, adjusted to sport-specific and sponsorship requirements |
| Sleeve Usage | May appear on sleeves or side panels as secondary branding elements | Sometimes included on sleeves for additional exposure in certain designs |
The distinct sizing and spacing of these logos ensure clear readability and prevent visual clutter, making both elements stand out effectively.
How to Balance Team and Sponsor Logos
Show off your team’s identity while keeping sponsors happy – without overloading the design.
File and Design Requirements
Start with high-quality vector files like .eps or .AI for scalability. Always include 300 DPI raster backups and transparent vector files with Pantone or CMYK color specs for accurate color reproduction .
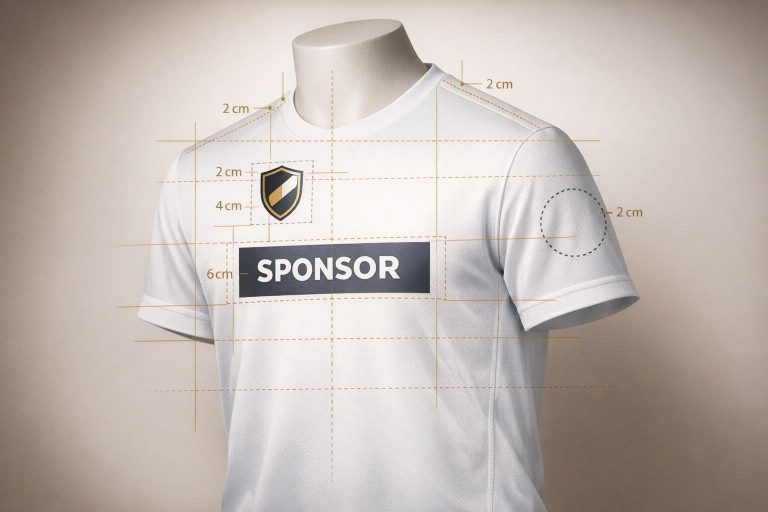
When it comes to colors, stick to 2–4 to avoid issues with registration during sublimation or heat printing. For sizing, team logos on the chest or sleeves should range between 2.5–5 inches, while primary team logos can go larger at 4–6 inches. Sponsor logos should stay smaller, between 1–4 inches, and are best placed on secondary areas like the shoulders or lower panels. This keeps the hierarchy clear. Position logos between the shoulder seams and armpits, with front logos set 3–4 inches below the collar. For women’s uniforms, adjust placements slightly higher by about 0.5–1 inch .
Once your file quality and sizing are set, focus on creating a clear visual hierarchy.
Balancing Visibility and Aesthetics
To ensure both team and sponsor logos stand out, prioritize a single primary team logo on the center chest or upper back. Limit sponsor logos to 2–3 smaller placements in secondary areas like sleeves or the lower back. For top-tier sponsors, keep their logos slightly larger – around 3–4 inches – and place them on prominent areas like the top back panel. Smaller sponsor logos can go below, with at least a 1-inch gap between each logo to avoid a crowded look .
A good rule of thumb? Pair a small chest logo (about 3×3 inches) with a larger back logo (anywhere from 6 to 10 inches). This setup keeps the uniform looking clean and professional. Mockups can help you identify any spacing or alignment issues before finalizing the design .
Following League and Sponsorship Rules
After refining the design, it’s critical to follow league and sponsorship guidelines. Many leagues enforce specific size limits – for instance, sponsor logos on sleeves might need to stay under 4×4 inches. Typically, team logos must take center stage on the front, while primary sponsors often claim exclusive spots like the upper chest. Overlapping logos or ignoring placement rules can lead to penalties, so double-check your designs .
Submit vector files for approval and confirm visibility tiers and restricted zones, like collars, as defined by the league. To avoid fines or rejections, ensure your design meets all requirements. Services like Wooter Apparel can help by offering free custom design support, ensuring your team logos stay central while sponsor logos are scaled and positioned correctly .
Conclusion
When it comes to logo placement, success hinges on maintaining a clear hierarchy, proper spacing, and following established guidelines. The team logo should always take center stage – literally. It’s commonly placed on the center chest or upper back, making it the visual anchor of the uniform. Meanwhile, sponsor logos should play a supporting role, typically located on the sleeves, shoulders, or lower panels. This balanced approach ensures the team’s identity remains front and center while still honoring sponsorship commitments – two key priorities outlined in this guide.
Before production begins, double-check the graphic quality and placement accuracy. It’s equally important to confirm league regulations and sponsorship agreements early in the process. Many leagues impose strict limits on sponsor logo sizes and require the team logo to remain the dominant feature. Submitting designs well in advance can help you avoid penalties or rejections.
If you’re feeling stuck or unsure about balancing team branding with sponsor visibility, Wooter Apparel offers free custom design support. They can help you create uniforms that meet all requirements while delivering a polished, cohesive look.
Final Recommendations
Here’s a quick recap of the most important tips for designing balanced uniforms:
- Prioritize the team logo by placing it in the most prominent position on the uniform.
- Use sponsor logos strategically, ensuring they complement rather than overshadow the team branding.
- Focus on precision with high-quality graphics and accurate placement tools.
- Review league and sponsorship rules early in the design process to avoid issues.
- Plan for durability, especially for active sports environments.
- Submit designs early to resolve any spacing or compliance concerns ahead of time.
FAQs
How do I choose the best logo spots for my sport?
When deciding where to position logos, focus on high-visibility areas like the front chest for primary designs. Make sure the logo size fits the garment – smaller logos work better on youth uniforms, for example. Avoid placing logos too close to seams or edges, as this can affect the design’s appearance and durability.
For accuracy, use tools like rulers or templates to guide placement, and always test on samples to check alignment, visibility, and overall look. Don’t forget to follow any sport-specific guidelines or league rules to ensure your final design meets professional standards.
What logo sizes work best on different uniform types?
For adult uniforms, chest logos are usually 6 to 10 inches wide, while logos on sleeves or collars are typically 3 to 4 inches. Youth uniforms, being smaller, use 3 to 4-inch chest logos and 2 to 2.5-inch sleeve or collar logos. Larger logos are ideal for the chest area, while smaller ones help maintain a clean, balanced look on sleeves or collars.
How can I add multiple sponsors without clutter?
When incorporating multiple sponsors, it’s important to prioritize strategic placement and sizing to keep the design clean and effective. Reserve prominent spots, such as the front chest, for key sponsors, while assigning secondary sponsors to areas like the sleeves, back, or shorts. Ensure consistent spacing between logos, ideally with gaps of 0.5–1 inch, and aim to feature no more than 3–5 logos per jersey. Using sublimation printing is a smart choice, as it embeds the logos directly into the fabric, offering long-lasting durability and a polished, professional appearance.