
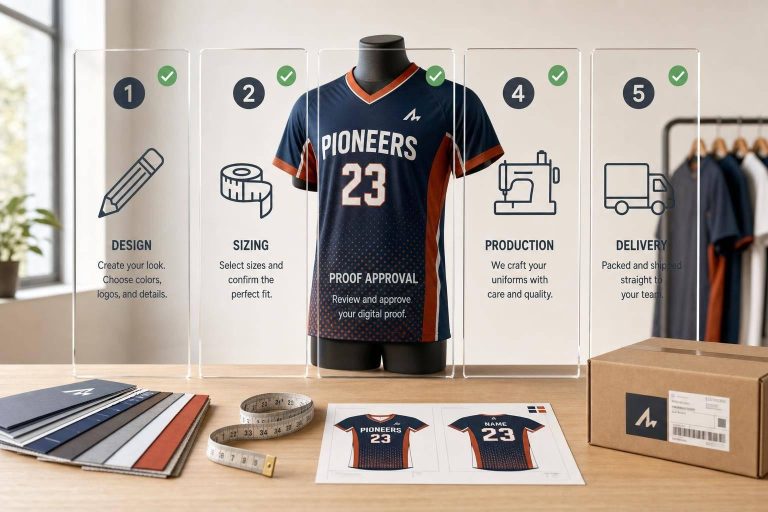
If I want custom uniforms to arrive on time, I need to lock the design, roster, sizes, and rules early. Most teams should start 8–12 weeks before the first game, and fully sublimated orders often take 20–25 business days in production, plus 2–7 business days for U.S. shipping.
Here’s the short version of the process:
- Set the order scope first: team colors, logos, budget, roster, and delivery date
- Check league rules early: number size, logo placement, embroidered patches, and color contrast
- Pick the build: sport-specific style, fabric, decoration method, and fit
- Review one mockup carefully: names, numbers, alignment, and readability from 10–15 feet
- Approve one final packet: artwork, sizes, quantities, and color codes
- Track production and inspect delivery: count items, check print quality, and report issues the same day
A few details make a big difference. I’d keep 5%–15% extra units in common sizes like M and L, use one point person for feedback, and save the final proof and roster for future reorders.
In short, this process is about making fewer late changes, avoiding rule issues, and keeping the order on schedule.
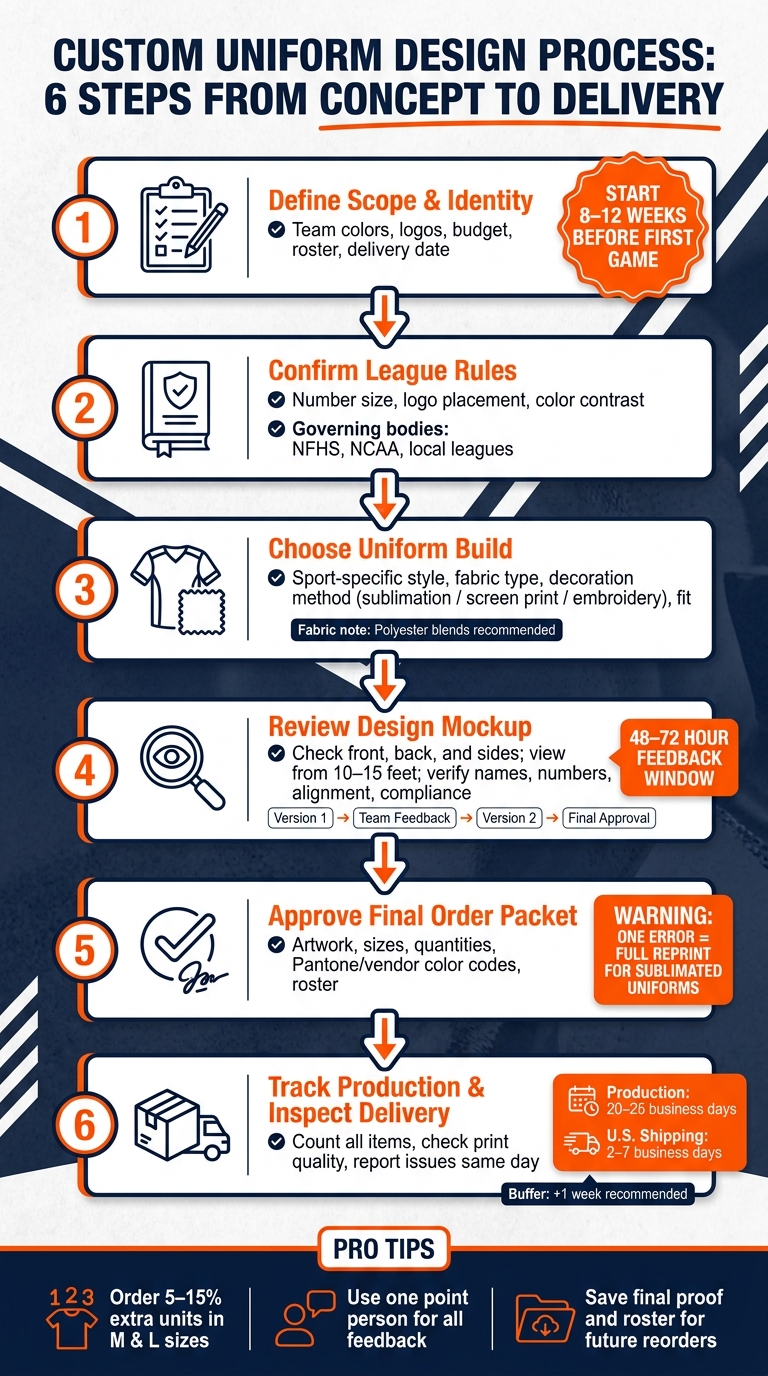
Custom Uniform Design Process: 6 Steps from Concept to Delivery
1. Define team identity, rules, and order requirements
Before any design work starts, get clear on who your team is and what you need to order. Skip this step, and things can go sideways fast: scope changes, compliance issues, and budget creep. The goal here is simple: lock the requirements before anyone starts making mockups.
Set the visual identity and required uniform pieces
Start with a one-page design brief. It should include your team name, mascot, color codes, logo order, and the style direction you want.
Then list every item you’ll need for the full season. Split them into:
- Required items: game jerseys, shorts, home and away sets
- Optional items: warmup jackets, shooting shirts, travel polos, bags
Lock that list before design begins. If you add a hoodie or a third jersey halfway through, you’re not just adding one item. You’re adding extra design rounds, more approvals, and a higher bill.
Confirm league rules and personalization details
Rules change by sport, so check the governing code before design starts. Review league or association rules, such as NFHS, NCAA, or local leagues, for number placement, visibility, contrast, and allowed logo locations. Catching those details early helps you avoid costly revisions later.
Numbers are only part of it. Decide upfront how player names will appear – last name, nickname, or no name at all. Also confirm whether sponsor logos are included and how school or club branding should appear. In scholastic settings, school branding needs to stay primary, while sponsor logos are usually limited to sleeves or lower-back areas. If sponsor approval is part of the process, build that review into your timeline from the start.
Build the budget and order plan
Once the design scope is fixed, set a per-player budget, then add coaches’ and staff gear. From there, choose a baseline, mid, or premium package.
It also helps to order 5% to 15% extra in common sizes, especially M and L. That gives you room for late roster additions and replacements without scrambling later.
One more thing: pick colors and design details that you can match again in future seasons. Specialty fabrics or one-off color mixes might look great now, but if they get discontinued, replacing a few uniforms can turn into a full redesign.
Plan to start 8–12 weeks before the first game. That gives you enough time for design, revisions, approval, production, and shipping.
With the scope locked, move to uniform type, fabric, and fit.
sbb-itb-4d95ad3
2. Choose the uniform type, fabric, and fit
Once the scope is set, move to the uniform type, fabric, and fit. This is where the requirements turn into the actual build, and those choices shape performance, durability, and comfort.
Match the uniform style to the sport and use case
Start with the sport. The cut and construction should match how the team plays.
Basketball and football, baseball and softball, and soccer all need different builds. Some call for sleeveless jerseys and shorts so players can move freely. Others need tougher pieces for contact and layering. Soccer kits, on the other hand, usually need to stay light for constant running.
After you match the cut to the sport, note any add-ons like:
- Warmups
- Practice gear
- Sideline layers
That keeps the order in sync and gives you a clean base for the first design concept.
Compare fabric performance and decoration method
Polyester and polyester blends are the standard for team uniforms because they wick moisture, dry fast, and hold up better than cotton. When comparing options, focus on breathability, stretch, weight, and durability.
For decoration, use the method that fits the item.
Use fully sublimated designs for game uniforms with full-color graphics and long-lasting color. The design is dyed into the fabric, so it doesn’t add extra weight or texture. Use screen printing for simple cotton items. Use embroidery for premium logos on travel polos.
Confirm sizing, cut, and player comfort
Before the order is locked, use a standard size form with chest, waist, hips, and inseam measurements in inches. Share a size chart or sample garments too. That step helps prevent approval delays later.
Fit should match the group wearing it. Youth sizing should allow more room for growth and movement. Adult sizing can be more fitted for athletic performance. For co-ed teams, offer women’s cuts when they’re available. Those usually have narrower shoulders, a shaped waist, and a shorter inseam. Also account for compression gear and base layers without adding bulk.
With the type, fabric, and fit set, the first mockup can move ahead with fewer revisions.
3. Create and review the first design concept
With the type, fabric, and fit already set, the next step is to turn those approved specs into the first visual proof.
Build the layout with colors, logos, names, and numbers
Start with the team’s primary color, main logo, and wordmark. On the front, place the team name or logo at center chest, then put the front number below it. For adult basketball and football uniforms, that number is often 6 to 8 inches tall so it can be read from the scorer’s table. On the back, make the jersey number the main element. It should sit centered, larger than the front number, with the player name above it, either arched or straight, in a clean font.
Use one font for numbers and one for names. Block and slab-serif styles usually read best from a distance and during play. Script and decorative fonts tend to blur once the game starts. For side panels, piping, and trim, choose one accent color that supports the team palette without fighting the numbers. Repeat that accent color on the shorts to tie the set together.
Keep one focal point per view. The front should focus on the team name or logo. The back should focus on the number. Secondary marks, like sponsor logos or league patches, belong in support spots such as the upper chest corner, back shoulder, or shorts leg. Don’t place any graphic directly behind a number. If a pattern has to sit in that area, use a solid panel or a contrasting outline so the number stays easy to read.
Review mockups for clarity, fit accuracy, and compliance
When the first digital proof comes in, review every angle: front, back, both sides, and shorts. Print the proof and look at it from 10 to 15 feet away. If the numbers still read clearly, the contrast is doing its job. A grayscale view is another fast check. If the numbers fade into the background, the color pairing needs work.
Check that numbers and logos are centered on flat panels, not sliding toward seams or curved areas that will warp once the uniform is worn. Make sure the design scales across the full size run. A youth small and an adult 3XL should use graphics that stay in proportion, not the exact same dimensions pasted onto every size. Then compare the proof against league rules. Match the design to the sport’s standards for number size, stroke width, and contrast.
| Review Area | What to Check |
|---|---|
| Legibility & Contrast | Numbers and names stand out clearly; outlines added if background pattern is present |
| Alignment & Balance | Logos and numbers centered on panels; consistent spacing from neckline and seams |
| Logo & Brand Usage | Correct logo version; no stretching or distortion; clear space kept around the logo |
| League Compliance | Number height, stroke width, and color contrast meet sport-specific rules |
| Personalization Details | Player names spelled correctly; no duplicate numbers; fonts match team standard |
After the proof clears review, collect one round of team feedback.
Gather feedback and manage revisions
Pick one decision-maker to gather feedback and send a single revision list to the designer. If several people send separate notes at different times, you almost always end up with mixed requests and a delayed production schedule.
Set a 48- to 72-hour feedback window, settle disagreements internally, and send one combined revision round. Keep the process simple:
- Version 1
- Team feedback
- Version 2
- Final approval
That setup keeps the timeline on track and makes sure nobody is reviewing an old proof. Do not send the design to production until final approval is signed.
4. Approve final artwork and document the order
Once the final proof is approved, lock the design and order details before production starts. At this stage, the approved proof becomes the single source of truth for the order.
Finalize colors, sizes, names, numbers, and quantities
Put the mockup, roster, and order summary side by side and check them line by line. They need to match exactly. If something is off – style, name spelling, number, or size count – fix it now.
For each player or staff member, confirm:
- exact name spelling
- assigned number
- size
- any special customization
Then check the total unit count by size across the full order, such as S×3, M×7, L×9, XL×4. A small mistake in the size run can leave the team short where it hurts most.
Also record the exact Pantone or vendor color codes for the base, trim, accents, and logos.
Create a clear approval record for production handoff
Save one approval packet with the final mockup, roster, and written approval. This record helps avoid disputes about what was ordered and makes repeat orders much easier in future seasons.
The table below gives a simple format for documenting the final order. Fill it out completely before authorizing production, with one row per garment line item.
| Field | What to Record |
|---|---|
| Garment type | Jersey, shorts, warmup jacket, hoodie, etc. |
| Cut / fit | Men’s, women’s, youth, unisex, pro fit, relaxed fit |
| Color codes | Pantone or vendor ID for base, trim, and accents |
| Logo placement | Front chest, left sleeve, back yoke – size in inches |
| Player name | Exact spelling and capitalization |
| Number | Assigned number per player; confirm no duplicates |
| Size | Individual size per unit (YS, S, M, L, XL, 2XL, 3XL) |
| Quantity | Total units per size across the full order |
| Approval status | Approved or pending, with approver name and date |
With sublimated uniforms, one approved file error can mean reprinting the full run. Once the packet is locked, the order can move to production.
5. Place the order, track production, and prepare for delivery
With approval locked, the work moves from design control to production control.
Submit the order and confirm production timing
Once the final proof, roster, and order summary are locked, submit the order.
Before you send it, do one last pass on the details. Check the final proof version, the locked roster file, the size-run totals, and the full shipping address. That includes a phone number and an email address that someone actually watches. If the shipment is headed to a school, gym, or park district site with limited hours, add a delivery note about building access. That small step can help the carrier avoid a missed drop-off.
For fully sublimated uniforms, standard production is usually 20–25 business days after final approval, roster submission, and payment. U.S. shipping then adds 2–7 business days. It’s smart to build in a one-week buffer on top of that.
After submission, track the order through each production milestone until it ships.
Track progress and prepare for delivery checks
After the order is placed, ask for written confirmation that includes:
- Order number
- Item list
- Total cost
- Ship date
- Delivery date
Most providers send updates at key milestones and share a tracking number once the order leaves the facility.
Inside your group, keep check-ins light and send all vendor communication through one point person, usually the team manager. That cuts down on crossed wires and mixed messages.
When the shipment arrives, inspect the outer boxes for damage before opening them. Then compare the total piece count to the packing slip. After that, pull at least one item from each size and design version. Check name spelling, jersey numbers, logo placement, and color accuracy against the approved proof.
For sublimated uniforms, look a little closer for print issues like ghosting, color banding, or misalignment. If something is off, photograph it the same day and contact the vendor right away.
Use Wooter Apparel for free custom designs and fully sublimated team uniforms
If your team wants help during this handoff, Wooter Apparel offers free custom design support. Wooter Apparel also provides fully sublimated uniforms for basketball, football, baseball, softball, and soccer, along with jerseys, shorts, warmups, hoodies, shooting shirts, and accessories.
Conclusion: Key steps for a smooth custom uniform design process
The process goes from planning to approval to production. First, lock in your team identity. Then choose materials, review mockups, approve the artwork, and send everything to production. Before you move on, save the final proof, roster, and size notes so the next order starts without a mess.
The goal is simple: make decisions early so production stays on schedule. If the timeline slips, everything else can slip with it.
For fully sublimated uniforms, production usually takes 20–25 business days after final approval and payment, plus shipping. That’s why it helps to finalize artwork and roster details 6–8 weeks before the first game.
Final checklist before placing a repeat order
After every order, save a complete record set so next season’s reorder is easy. Your final approval packet should become your reorder file. Once approval and delivery are done, keep these records:
- Approved mockups – front, back, and side views
- Exact color codes – Pantone or hex values
- Final roster file – names, numbers, sizes, and naming format
- Size breakdown notes – which sizes ran small or large
- Order confirmation and invoice – pricing and reorder reference
- Delivery and quality notes – issues to check next time
With those files on hand, a repeat order can be as simple as using the same design with an updated roster. That’s the whole point: a process you can repeat without starting from scratch every time.
FAQs
What causes the biggest delays?
The biggest slowdowns usually come from feedback and approval.
Work tends to drag when revision notes trickle in over several days instead of arriving in one clear, detailed batch. That back-and-forth eats up time fast.
Another common bottleneck is final sign-off from all stakeholders, because production starts only after approval is in place. Missing materials can also hold up the first mockup, especially things like high-resolution logos, color codes, or budget details.
How do I avoid sizing mistakes?
Don’t rely on прошлые сезоны or gut feel. Wait until the exact product style is locked in, because each item can fit a little differently.
Use a measuring tape to record every player’s chest, waist, and height. Then match those numbers against the product-specific size chart. It also helps to set a firm roster lock date and keep all sizing details in one spreadsheet before you approve the final order.
What should I do if the order arrives wrong?
The available information doesn’t spell out a separate process for orders that arrive incorrectly. Instead, Wooter Apparel puts most of the focus on the approval stage before production starts.
That means the digital mockup or 3D preview acts as the final blueprint for your order.
If you spot anything off, fix it during the review phase before you approve the design or submit payment. That’s the main checkpoint for checking details like:
- colors
- logos
- spelling
- placement
Once that proof is approved, it moves into production based on that version.