
Approving custom uniform designs is a critical step that ensures your team’s uniforms are accurate and align with your branding before production begins. Errors caught during this stage can save significant time and money. Here’s what you need to do:
- Review Mockups Thoroughly: Check logos, text, colors, and design elements for accuracy. Use vector files (.ai or .pdf) and specific Pantone codes for precise results.
- Verify Consistency: Ensure all uniform pieces match in design, colors, and placement of elements like logos and numbers.
- Check Sizing: Compare sizing charts to existing uniforms and request a sizing kit if needed.
- Spot Errors Early: Look for misspellings, incorrect numbers, or misplaced elements. Provide clear feedback for revisions.
- Final Approval: Confirm all details, including colors, logos, sizes, and quantities, before production begins. Production starts only after payment is completed.
This process minimizes mistakes and ensures your team’s uniforms are exactly as envisioned. Wooter Apparel offers free mockups, multiple revisions, and Pantone color matching to streamline the process.
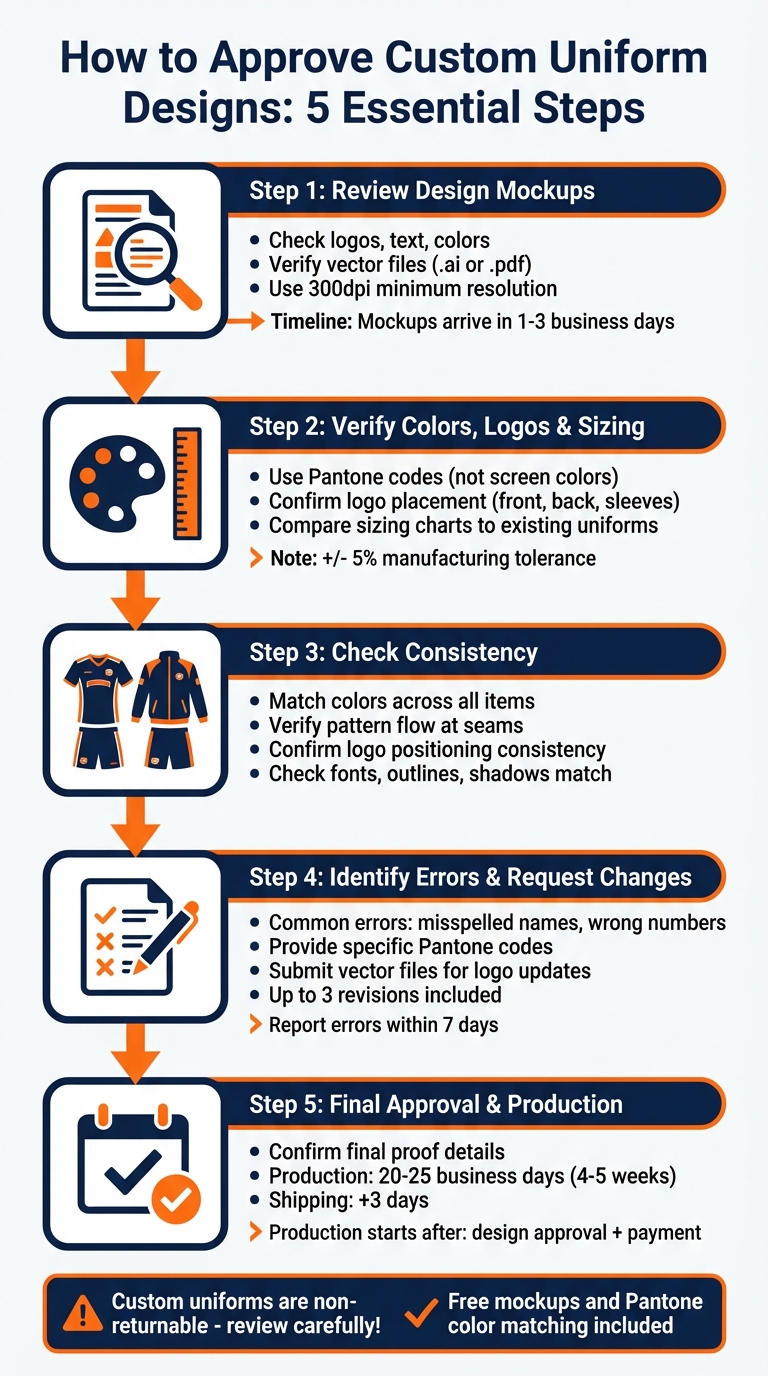
5-Step Custom Uniform Design Approval Process
Step 1: Review Design Mockups for Accuracy
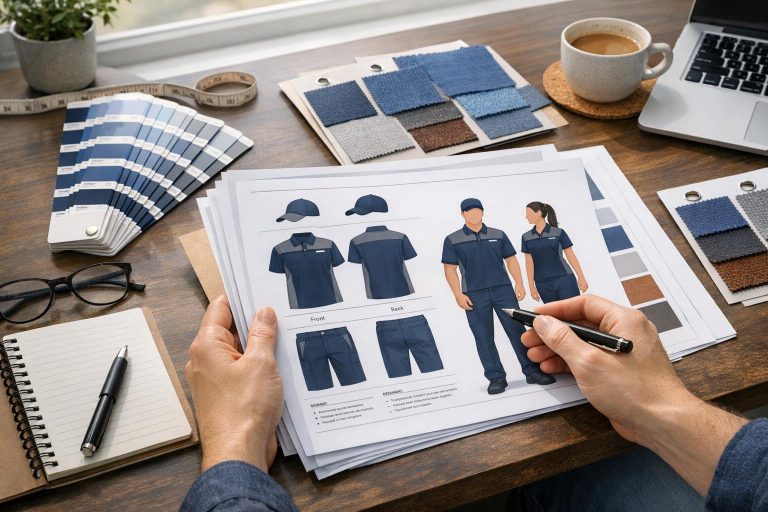
When you receive your mockup (typically within 1–3 business days), take a close look to ensure it aligns with your design vision. This is your last opportunity to make changes before production starts, as uniforms usually move into production the next business day after payment.
What to Check in Your Mockups
Start by zooming in on the logo. If it appears blurry or pixelated, double-check that you’ve provided a vector file (like .ai or .pdf) or an image with at least 300dpi resolution.
Next, review all text for accuracy. Confirm that team names, player numbers, and font styles match your brand guidelines exactly. Pay special attention to placeholders for player names and numbers, ensuring they are styled and positioned just the way you want them.
After verifying these details, focus on color accuracy and logo placement. These final checks are critical to ensuring the mockup represents your team’s branding before production begins.
Confirm the Design Matches Your Team Branding
Be precise with colors – avoid vague names like "blue" or "red." Instead, use Pantone codes to eliminate any confusion. As Wooter Apparel puts it:
"Pantone is a global standard that ensures we’re all speaking the same language when we talk about color, allowing us to do a better job of producing the colors that you ordered."
For added accuracy, use a Pantone bridge book to verify the colors. This step ensures your uniforms will reflect the exact shades you envisioned.
Step 2: Check Colors, Logos, and Sizing
Confirm Colors Are Accurate
Keep in mind that screen colors are only a reference and might not match the final printed product. For accuracy, rely on Pantone codes instead of screen displays. If you’re unsure about the correct Pantone values, consult your brand guidelines for clarification.
Ensure Logo Placement and Quality
Once colors are verified, it’s time to inspect the logos and other graphic elements. A sharp logo is essential – any blurriness likely points to a low-quality file. As Wooter Apparel emphasizes:
"It’s important to use an original vector file such as an .ai or .pdf so your print comes out sharp."
Check that logos are placed exactly where they should be, whether on the front, back, or sleeves. Double-check the positioning of player names and numbers as well, as these are typically included without extra charges.
Double-Check Sizing Accuracy
Proper sizing is just as important as getting the colors and graphics right. Keep in mind that sizing charts reflect garment measurements, not body measurements. To ensure a good fit, compare the chart with a uniform that already fits well. Note that finished garments may have slight variations of up to +/- 5% due to manufacturing tolerances.
For large orders, consider requesting a sizing kit with a refundable deposit to avoid future issues. Wooter uniforms are designed to run larger and are made with stretchy fabric for flexibility. Since custom uniforms can’t be returned or exchanged, taking the time to review sizing thoroughly can save a lot of trouble later on.
Step 3: Check Consistency Across All Uniform Items
After reviewing your mockups, the next step is ensuring that every design element aligns perfectly across all uniform pieces. This step is crucial for delivering a polished and professional final product. Once individual elements are verified, take a broader look at how they work together across the entire uniform set.
Compare Multiple Items for Matching Designs
Lay out the mockups for jerseys, shorts, hoodies, and any other uniform items side by side. Pay close attention to color consistency. This is where using specific Pantone codes becomes indispensable – it removes any guesswork and ensures uniformity across all pieces.
Examine how patterns and gradients transition across seams, hems, sleeves, and collars. Sublimation printing demands precision, so patterns should flow seamlessly from one panel to the next without any awkward interruptions or mismatches. Check that logos are positioned consistently across different garment types. For example, the logo placement on a jersey should match its position on a hoodie or a warm-up jacket. Dive into the smaller details to catch subtle inconsistencies that could affect the overall look.
Look for Small Inconsistencies
Take a closer look at fonts, outlines, and shadows. Ensure that player names and numbers use the same font files, sizes, and outline thicknesses across all items. Shadows, if used, should be consistent in placement and intensity between jerseys, shorts, and other pieces.
It’s a good idea to have someone else review the mockups with you. A fresh perspective can often catch small errors that you might miss, such as slight variations in logo sizes or color tones between items. Since custom uniforms are non-returnable, spotting these inconsistencies now can save you from costly mistakes and frustration down the line. Another set of eyes can make all the difference!
sbb-itb-4d95ad3
Step 4: Identify Errors and Request Changes
After ensuring your design is consistent, it’s time to focus on spotting specific errors that could disrupt your order. Since custom uniforms are non-returnable, this is your last chance to catch and fix mistakes. Misspelled names and incorrect numbers are some of the most common issues during this stage, so cross-check every player’s name against your roster sheet carefully. This step transitions your review from general consistency to pinpointing and correcting individual errors.
Common Design Errors to Look For
Now that you’ve reviewed for consistency, take a closer look at potential design flaws that might have slipped through. Start by verifying that all names are spelled correctly, numbers align with your roster, and fonts are consistent across all items, including proper outline thickness. Pay attention to color accuracy as well. As Wooter Apparel explains, "One mistake people make is just saying ‘orange’. There are over 200 shades of orange in the Pantone system, so it is best to be specific!". If you didn’t provide exact Pantone codes earlier, now is the time to confirm the specific shades displayed in the mockups.
Inspect graphics thoroughly. Blurred or pixelated logos often result from uploading rasterized images instead of vector files. Review logo placement, sponsor marks, and player numbers to ensure they’re positioned correctly. Additionally, check that scaling adjustments across different sizes haven’t compromised logo clarity or placement. Confirm that all variations and add-ons discussed during the design process are reflected in the mockups. Missing elements at this stage will lead to missing details in the final product.
Identifying errors now and providing clear revision instructions can prevent delays and ensure the final design meets expectations.
How to Request Revisions Clearly
When you find an error, be as specific as possible in your feedback. Avoid vague comments like "the color is wrong." Instead, specify the exact Pantone code required. If a logo is out of place, detail the exact measurements or refer to the design template. Document every adjustment in writing, including placement, dimensions, colors (using Pantone codes), fonts, and stroke thickness.
For logos, submit updated files in vector formats like .ai, .pdf, or .eps to maintain quality. Most design packages include up to three revisions on a chosen concept, so use them strategically. To qualify for a redo, report any errors within 7 days and provide photographic evidence. Keep in mind that after 30 days, Wooter Apparel will no longer process corrections or redos. A detailed review and clear communication now will help ensure your team’s uniforms are exactly as envisioned.
Step 5: Give Final Approval and Confirm Production
After addressing all errors, it’s time to give the final go-ahead. This is your last chance to ensure everything is perfect before production begins. But remember, production doesn’t kick off the moment you approve the design. It only starts once three conditions are met: the designs are confirmed, sizes and quantities are finalized, and full payment is received. Think of this step as the bridge between the design process and production readiness. Double-check every detail to avoid any surprises later.
Review the Final Proof
Before you greenlight production, take a close look at the final proof. Make sure all logos are in vector format (.ai or .pdf) and that Pantone codes align perfectly with your brand’s colors. Check your roster sheet carefully to confirm that player names, jersey numbers, and sizing details are accurate. If you’ve worked on multiple design variations, clearly specify which version should move forward. For image files like .png, ensure they have transparent backgrounds so they’ll work seamlessly on any colored surface during printing. As Wooter Apparel emphasizes, "It’s important to use an original vector file such as an .ai or .pdf so your print comes out sharp".
Confirm Delivery Timeline
Once you’ve approved everything, confirm the production and delivery schedule. Production usually takes about 20–25 business days (roughly 4–5 weeks) from the time designs, sizes, and payment are finalized. After that, shipping typically adds another 3 days. If time is tight, expedited options are available for an additional fee. Be sure to communicate your required delivery date to your account manager as early as possible. Production officially starts the next business day after your invoice is paid in full or a purchase order is submitted.
When it comes to delivery, provide an address where someone can sign for the package since custom uniforms are valuable and require a signature upon receipt. If there’s an issue with your order – like misspellings, missing items, or damage – report it within 7 days of delivery to be eligible for a redo.
Conclusion
As you wrap up the approval process, here are some key aspects to keep in mind to ensure everything is on point.
Main Points to Remember
Double-check every detail carefully. Make sure branding elements align with your standards, and use Pantone color codes rather than generic names to guarantee consistent colors across all garments. Confirm player names, numbers, and sizes against your roster, and clearly indicate which design variation should proceed to production if multiple options were created.
Production will only begin after receiving your confirmation and full payment. From reviewing mockups to setting production timelines, every step plays a role in achieving flawless results. To ensure a proper fit, request refundable sizing kits before finalizing.
Why Choose Wooter Apparel?
Wooter Apparel makes the approval process seamless by offering free custom design services and delivering professional mockups within 1–3 business days. They allow up to three revisions per concept stage, giving you the flexibility to fine-tune every detail before production. Their full sublimation printing ensures that names, numbers, and logos remain intact – no peeling, cracking, or fading over time. With a 4.9-star rating based on 1,239 reviews, Wooter Apparel has earned a reputation for quality and reliability. Each order undergoes a final Quality Assurance check after stitching to ensure accuracy before it ships. By simplifying every step, Wooter Apparel guarantees your team will look as sharp as they play.
FAQs
What should I do if the colors on my uniform design don’t match my brand’s colors?
If the colors on your uniform design don’t match your brand’s official colors, check them against your brand’s Pantone swatches or the color codes listed in your style guide. Share the specific Pantone code or color details with your design team. This will help them make the needed adjustments and send you an updated proof.
By doing this, you can ensure your uniforms align perfectly with your brand identity and look just the way you imagined.
How can I make sure the custom uniforms will fit my team properly?
To get the perfect fit for your team, start by taking precise measurements for each player. Focus on key areas like chest, waist, hips, inseam, sleeve length, and shoulders. Once you’ve got the numbers, double-check them and compare them to Wooter Apparel’s size charts. Keep in mind, these charts account for a ±5% manufacturing tolerance, and the uniforms are designed to be slightly larger with a bit of stretch. If you’re unsure about sizing, you can always request a sizing kit to make sure everything fits just right before placing your order.
What should I do if I notice a mistake in the uniform design after production begins?
If you notice an error in the design after production begins, contact support@wooterapparel.com right away. Be sure to include a detailed explanation of the problem and any supporting materials, like design files or photos, to help the team evaluate and resolve the issue.
Although custom orders cannot be refunded, Wooter Apparel is dedicated to addressing concerns and making sure you’re satisfied with the outcome.