
Stitching quality in team uniforms can make or break performance and durability. Here’s how to ensure your uniforms are up to the challenge:
- Durability: High-quality stitching withstands intense activity and frequent washing, preventing tears and costly replacements.
- Performance: Flat seams and reinforced stress points enhance movement and reduce irritation, helping athletes stay focused.
- Comfort: Smooth stitching eliminates rough edges, ensuring distraction-free wear.
Quick Inspection Tips:
- Visual Check: Look for loose threads, uneven seams, or puckering.
- Stress Test: Gently pull seams in high-stress areas like shoulders, side seams, and crotch to check for gaps or breaks.
- Stitch Density: Measure stitches per inch (SPI). Higher SPI means stronger seams.
- Elastic Testing: Stretch elastic seams to ensure they recover and hold up under tension.
Tools to Use:
- Ruler for measuring SPI.
- Magnifying glass for fine details.
- Bright light for spotting gaps or flaws.
Thorough inspections ensure your uniforms are durable, functional, and ready for the demands of sports. A small investment in quality control today prevents bigger issues down the line.
LOW vs HIGH QUALITY: HOW TO SPOT IT | seams, stitching, print, zips, buttons, fabric | Beate Myburgh

Key Stitching Quality Standards
When it comes to team uniforms, stitching quality is more than just a detail – it’s the backbone of durability, functionality, and overall appearance. High-quality stitching doesn’t just keep seams intact; it ensures the garment performs well under pressure, looks sharp, and lasts longer. These standards are critical for creating uniforms that deliver both on and off the field.
What Makes Good Stitching in Team Uniforms
To meet industry requirements, stitching must be clean, strong, and consistent. Precision is key – seam allowances should be uniform, and every seam should be free of loose threads, uneven lines, or gaps. Inconsistent seam allowances not only make uniforms look sloppy but can also affect how they fit and function.
Reinforcement in high-stress areas like side seams, underarms, and the crotch is another must. These areas endure the most strain during athletic activities, and without proper reinforcement, seams are prone to splitting.
A key metric for stitching quality is stitches per inch (SPI). A higher SPI typically means stronger seams, as the fabric is held together more securely. For athletic uniforms, stretch compatibility is equally important. Stitched seams should be able to stretch 25%–50% along with the fabric to ensure they don’t restrict movement.
By adhering to these technical standards, uniforms can maintain their integrity while offering superior performance and durability.
How Stitching Affects Performance and Durability
Poor stitching doesn’t just look bad – it compromises the uniform’s performance and lifespan. Weak seams can fail under the stress of athletic movements, leaving athletes with garments that don’t hold up when it matters most.
Comfort is another critical factor. Heavy threads or rough seams can irritate the skin, distracting athletes and affecting their focus. Using specialized threads, like woolly nylon or textured polyester, helps create soft, smooth seams that reduce discomfort.
High SPI and reinforced stress points ensure uniforms withstand frequent washing and the physical demands of sports. Stretch-friendly stitching methods, such as zigzag stitching, overlock seams, and coverstitch construction, allow seams to move with the fabric, providing a full range of motion. Without these techniques, seams can restrict movement, hindering athletic performance.
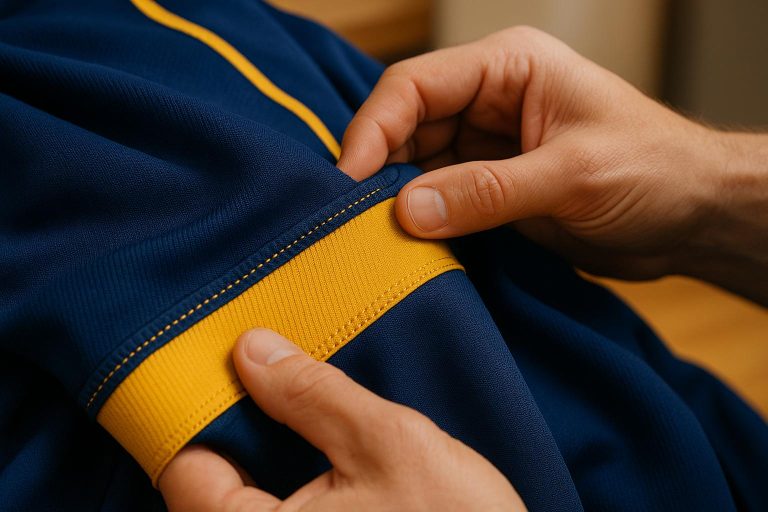
For high-performance uniforms, flatlock stitching stands out as one of the best options. This method overlaps fabric by 1/8 inch without folding back the seam allowance, creating smooth, durable seams that minimize irritation during intense activity. It’s a game-changer for athletes who need both comfort and reliability in their gear.
Step-by-Step Visual Inspection Guide
Visual inspection is your first line of defense when it comes to identifying poor stitching quality. By taking a thorough, hands-on approach, you can catch potential issues before they turn into major problems during athletic activities. The secret lies in knowing exactly what to look for and following a systematic process to examine every part of the uniform. Use this guide to ensure nothing gets missed.
Visual Inspection Checklist
Start your inspection under bright, natural light or white LED lighting for maximum visibility.
- Major seam lines: Focus on side seams, shoulder seams, and inseams. These areas endure the most stress during physical activity. Run your fingers along the seams to detect uneven thickness or gaps in the stitching.
- Hems and edges: Check sleeve cuffs, necklines, and bottom hems. These should lie flat without any puckering or bunching. Pay extra attention to curved areas, like necklines, where maintaining uniform stitching can be trickier.
- Stress zones: Examine high-tension areas such as underarms, crotch, and pocket regions. These spots often have extra reinforcement stitching. Make sure the additional stitching is intact and properly aligned.
- Turn the uniform inside out to inspect the seam finishes. A well-made uniform should look neat on both the inside and outside, with no loose threads or messy edges.
Common Stitching Problems to Look For
Once you’ve checked the seams, keep an eye out for these common issues:
- Loose threads: These are a clear indication of sloppy workmanship. Stray thread tails not only make the garment look unfinished but could also point to rushed or careless construction.
- Inconsistent stitching: Look for uneven, crooked, or broken stitches along the seams. This can make the uniform appear unprofessional and may weaken its durability. You might also notice fabric bunching along uneven seams, which is another red flag.
- Puckering: This happens when fabric gathers or wrinkles along the seam, often due to incorrect thread tension during sewing. It’s a sign of poor quality control.
- Light test: Hold the seam up to a light source. If light shines through holes or gaps, it means there are fewer stitches per inch, which compromises durability.
Tools for Better Visual Inspection
While many flaws can be spotted with the naked eye, using the right tools can help you catch subtle issues that might otherwise go unnoticed.
- Measuring tape or ruler: Essential for checking seam allowances and ensuring measurements are consistent across the uniform.
- Magnifying glass or jeweler’s loupe: Perfect for closely inspecting fine stitching details and thread quality, especially in areas with dense or intricate stitching.
- Bright LED flashlight: Handy for performing the light test and spotting stitching gaps or weak points.
- Defect stickers or marking tape: Use these to flag problem areas for follow-up or repair, ensuring no issues are overlooked during the inspection.
Keeping a record of your findings can also help you identify recurring problems and improve quality control over time.
How to Stress Test Stitching and Seams
Visual checks might catch obvious flaws, but stress testing tells you how a uniform will truly perform under game-day conditions. To assess stitching and seam durability, you need to simulate the physical demands of athletic performance – stretching, running, and quick movements. By applying controlled pressure, you can uncover how well the seams hold up in real-world scenarios. Below are practical methods for testing seam integrity.
Testing Seam Strength and Stretch
Focus on areas that endure the most tension during use. Start with the neckline and armholes, as these spots stretch regularly when players put on or take off uniforms. Gently but firmly pull the fabric on either side of the seam for 5–10 seconds. Keep an eye out for gaps, loose stitching, or any separation between the fabric and the seam.
For side seams, hold the uniform at waist level and stretch it horizontally. High-quality seams should stay intact, with no visible stress marks or unraveling threads. If you hear a popping sound, it’s a sign that the threads are breaking under minimal strain.
Shoulder seams require a slightly different approach. Place one hand on the front panel and the other on the back panel, then pull in opposite directions. The seam should stay flat and secure. If the fabric bunches up or the seam looks wavy, it’s a sign of poor thread tension.
Curved seams, like those around the neckline, need extra attention. Stretch the fabric in multiple directions to see if the stitching maintains smooth curves. Any puckering or sharp angles could indicate weak points that might fail during wear.
Pull Testing Elastic Seams
Elastic seams, such as those in waistbands, sleeve cuffs, and leg openings, are designed for repeated stretching and recovery. To test these, stretch the elastic seam to 150% of its original length – this mimics the strain it will face during athletic activities.
Hold the stretch for 10–15 seconds and then release. A quality elastic seam should snap back to at least 95% of its original size almost immediately. If the fabric stays stretched out or takes too long to recover, the elastic or stitching may be substandard.
Take a close look at the stitching pattern on elastic seams during the stretch test. High-quality uniforms often use zigzag or overlock stitches, which flex with the fabric. Straight stitching in elastic areas is a red flag – it’s prone to breaking under normal use.
Waistband testing is especially critical. Stretch the waistband by pulling at opposite points to simulate the motion of putting the garment on. The stitching should hold firm, and the elastic should provide even resistance across its length. Uneven tension or loose spots suggest flaws in the construction.
Testing High-Stress Areas for Wear
Certain areas, like side seams and inseams, endure the most stress from athletic movements. Perform a tug test by grasping the fabric 2 inches on either side of the seam and applying firm, steady pressure. Gradually increase the force – you should feel strong resistance before any threads start to break.
Crotch seams in pants and shorts are particularly vulnerable. Test them by holding the front and back panels and pulling in opposite directions. Check for reinforcements at the start and end of the seams, as these are common weak points.
For pockets, insert your hand and apply pressure to the stitching. Quality stitching should hold firmly without showing stress marks. If the seams strain under light testing, they’re unlikely to withstand regular use.
Armpit areas also experience significant stress from arm movements. To test these, pull the sleeves away from the torso while holding the body of the uniform. Look for signs of thread separation or fabric distortion around the armhole seam. High-quality uniforms often use French seams or flat-fell seams in these areas to boost durability under strain.
sbb-itb-4d95ad3
Measuring Stitch Density and Consistency
Stitch density and consistency are key indicators of a uniform’s overall quality. Beyond stress testing, examining the finer details of stitching can provide valuable insights into durability. At Wooter Apparel, we pay close attention to these factors, ensuring every uniform meets our high standards for strength and performance. A critical step in this process involves accurately measuring stitch density.
How to Measure Stitches Per Inch (SPI)
Stitches per inch (SPI) is a widely used metric to evaluate seam strength and craftsmanship. While a higher stitch count often means stronger seams, the ideal density varies based on the fabric type and the seam’s location. For example, standard seams in team uniforms generally have a high stitch count, but areas under more stress – like armholes or side seams – often require even denser stitching for added reinforcement.
To measure SPI accurately, place a ruler perpendicular to the seam and count the full stitches within one inch. If a partial stitch falls mostly within the measured area, include it in your count.
Different fabrics call for different stitch densities. Lightweight materials often need a higher stitch count to ensure durability, while heavier fabrics might hold up well with slightly fewer stitches. Regardless of the material, areas that experience frequent stretching – such as waistbands or sleeve openings – should always feature denser stitching to prevent wear and tear.
When inspecting a seam, check its beginning, middle, and end for uniformity. Any noticeable changes in stitch density along the seam could point to quality control issues. Additionally, curved seams should maintain even stitching throughout. Gaps or bunching in these areas could signal potential weak points.
Checking Consistent Stitch Length and Tension
Once seam strength is assessed, the next step is to evaluate stitch length and tension. Uniform stitch length is critical for both the durability and visual appeal of a uniform. Uneven stitches can create weak spots, as some stitches may bear more stress than others, increasing the risk of seam failure. High-quality uniforms are characterized by consistent stitch lengths across all seams.
Here are a few tips for assessing stitch consistency:
- Inspect seams under bright, natural, or LED lighting to spot irregularities.
- Look for stitches that are noticeably longer or shorter than others, as these can create uneven or wavy seams.
- Run your fingers along the seam to feel for any inconsistencies.
Thread tension is another crucial factor. Proper tension ensures the thread lies flat and smooth against the fabric. Over-tightened threads can cause the fabric to pucker, while loose threads may result in loops or gaps. Always examine both the top and underside of the seam. Consistency on both sides suggests that the sewing machine settings were well-calibrated during production.
For stretch fabrics, check how the stitching performs when the material is extended to its normal wearing position. Any gaps or uneven stitching under tension may indicate that adjustments to the sewing settings are needed. Lastly, consistent stitching also includes attention to thread color and seam finishing. Threads should closely match the fabric color, and all loose ends should be neatly trimmed and secured. Visible mismatches or loose threads can indicate rushed or careless production, which could compromise the uniform’s overall quality.
Final Quality Check Steps
Once you’ve completed visual and stress tests, it’s time to wrap up with a comprehensive quality review. This final step ensures every detail of the uniform meets high standards, from stitching to finishing touches.
Recording Inspection Results
Keep a detailed record of your inspection findings using a standardized checklist. These records help identify recurring issues and guide future improvements. Photograph critical findings, especially defects or standout examples of excellent stitching. For instance, take close-up shots of loose threads or uneven seams alongside examples of flawless work. These images not only document the current state of the uniforms but also serve as evidence for warranty claims and create a reference for future inspections.
When noting issues, be as specific as possible. Instead of vague descriptions like "loose stitching found", write something like "loose stitching on the left shoulder seam, 2 inches from the armpit." This level of detail makes it easier to pinpoint problems and communicate effectively with manufacturers when corrections are needed.
Digital tools can simplify this process. Many quality control apps allow you to attach photos directly to checklist items, keeping everything organized and easy to share. If apps aren’t available, a spreadsheet with columns for uniform piece, inspection area, pass/fail status, and notes works just as well.
Don’t forget to include dates and inspector names for accountability. This becomes especially important when managing large orders or inspecting multiple uniform sets. To quantify overall quality, consider using a 1-5 rating scale for each uniform.
As you document your findings, flag any irregularities immediately so they can be addressed. Once you’ve thoroughly reviewed the stitching, move on to finishing details to complete the inspection.
Additional Areas to Check
The finishing touches on a uniform are just as important as the core stitching. These details can make or break the professional look of the final product.
- Hems: Check that hems are flat and even, with no puckering or raw edges.
- Labels: Ensure all labels (size, care, brand) are securely attached and lie flat. Heat-pressed labels should adhere completely, with no lifting edges.
- Fasteners: Test zippers by operating them multiple times to ensure they move smoothly and align properly. For snaps or buttons, check that they are securely attached, align correctly, and operate without issues. Buttons should have proper thread tension and reinforcement stitching if needed.
- Elastic Components: Stretch elastic bands fully to confirm they recover their shape and distribute stretch evenly. Ensure the stitching securing the elastic remains intact under tension.
- Color Consistency: Lay out complete uniform sets under consistent lighting to spot any color differences between pieces like jerseys and shorts. Even slight variations can look unprofessional.
- Fit and Functionality: Conduct a fit test on sample uniforms. Check that seams and placements allow for full movement without creating stress on stitched areas. This step ensures the uniforms not only look great but also meet the team’s performance needs.
At Wooter Apparel, these final quality checks ensure every uniform delivers on performance, durability, and style. By investing time in detailed inspections and thorough documentation, you can transform quality control from a guessing game into a reliable process that consistently produces professional results. The effort you put in now pays off with satisfied teams and long-lasting uniforms.
Conclusion: Checking Stitching Quality in Team Uniforms
Ensuring top-notch stitching quality in team uniforms requires a thorough and methodical inspection process. Start with a close visual check, looking for loose threads, uneven seams, or irregular patterns. Then, focus on high-stress areas like shoulders, side seams, and elastic sections by performing stress tests. Consistency in stitch density is key, so take precise measurements and document your findings with notes and photographs for future reference.
Taking the time to inspect stitching thoroughly pays off in the long run. Durable seams can handle the demands of intense athletic activities – whether it’s a baseball player diving for a catch or a basketball player battling for a rebound. On the other hand, poor stitching can lead to uniform failures and costly replacements mid-season.
Teams that emphasize stitching quality benefit from uniforms that retain their polished look, even after repeated use and washing. Reliable stitching not only ensures durability but also boosts team morale. When players trust their uniforms to hold up under pressure, they can focus entirely on their performance, giving them the confidence to play their best.
FAQs
What are the signs of poor stitching in team uniforms, and how can they impact performance?
Poor stitching in team uniforms shows up in several ways, like uneven seams, loose threads, unfinished hems, or misaligned patterns. These flaws don’t just make the uniforms look unpolished – they can also lead to issues like fraying, tearing, or even shrinking over time.
Beyond appearance, these problems can seriously affect performance. Weak stitching can compromise durability and make the uniforms uncomfortable to wear. Imagine trying to move freely during a game while dealing with tight seams or worrying about a tear mid-action – it’s distracting and potentially unsafe. Choosing uniforms with strong, reliable stitching means your team can focus on the game, stay comfortable, and avoid unnecessary risks.
How do I check the stitches per inch (SPI) on a uniform, and why does it matter?
To measure the stitches per inch (SPI) on a uniform, grab a ruler and align it with the seam. Then, count how many stitches fit within a single inch. This simple check gives you a clear idea of the stitch density, which plays a big role in the uniform’s durability and overall strength.
Uniforms with a higher SPI tend to have tighter, sturdier seams. These seams are better equipped to handle the rough-and-tumble of intense games and constant washing. For team uniforms, this durability is key to keeping them in good shape throughout the season while still performing as intended.
How can I check the stitching quality of custom team uniforms?
To evaluate the stitching quality of custom team uniforms, begin with a visual inspection. Examine the garment closely for any loose threads, uneven stitching, or unfinished seams. Quality stitching should look uniform, tight, and free from gaps or fraying edges.
After that, conduct stress tests on critical areas like seams and joints. Gently tug on these spots to check if the stitching holds firm under pressure. Focus on high-stress areas such as the underarms, shoulders, and side seams, as these are more prone to wear and tear.
By following these straightforward steps, you can ensure your team uniforms are well-made, durable, and ready to deliver both functionality and style during games or practices.