
Defect classification in sports uniforms ensures quality, safety, and performance. Here’s what you need to know:
- Defects are categorized into three types:
- Critical: Unsafe or unusable (e.g., tearing fabric, harmful contaminants).
- Major: Impacts appearance or functionality (e.g., crooked logos, color mismatches).
- Minor: Cosmetic issues (e.g., loose threads, slight misalignments).
- Why it matters:
- Protects athletes and enhances team image.
- Prevents costly issues and maintains consistency.
- Builds trust with players and fans.
- Inspection process:
- Use proper lighting and tools (e.g., measuring tape, magnifying glass).
- Check for structural flaws, sizing, and graphic alignment.
- Document findings with photos and detailed notes.
- Best practices:
- Train inspectors to spot and classify defects accurately.
- Use customer feedback to improve quality.
- Maintain clear communication with manufacturers.
Key takeaway: A structured inspection and classification process guarantees that every uniform performs as expected and looks professional.
CLASSIFY GARMENT DEFECTS
Main Defect Categories in Sports Uniform Inspection
When inspecting sports uniforms, a three-tier system – critical, major, and minor defects – helps ensure quality standards are met. Each category addresses specific issues, starting with those that could compromise safety.
Critical Defects
Critical defects are the most severe, making uniforms unsafe or completely unusable. These issues demand immediate rejection as they pose risks to athletes or fail to meet the garment’s basic purpose.
- Safety hazards are a top concern. Items like sharp objects in seams, exposed needles, or metal fragments can cause injuries during play.
- Severe fabric contamination is also critical. Chemical stains that irritate the skin, oil-based marks that can’t be cleaned, or other harmful substances fall into this category.
- Structural failures that render the uniform unwearable, such as a jersey with a detached sleeve or shorts with a broken waistband, are unacceptable.
- Extreme size discrepancies also qualify. For instance, a medium jersey that fits like an extra-large, or receiving youth sizes instead of adult ones, makes the uniform unsuitable for its intended use.
Major Defects
Major defects affect the functionality or professional appearance of the uniform, though they don’t pose safety risks. These flaws can impact performance or the team’s image.
- Visible holes, tears, or missing stitches along seams or hems undermine durability and appearance. These issues can worsen with use.
- Color inconsistencies across a uniform or team set stand out. Faded areas, color bleeding, or mismatched shades can make players look uncoordinated on the field.
- Logo and text errors – such as crooked team names, misspelled words, or off-center graphics – damage the team’s professional image.
- Noticeable sizing variations that don’t meet expectations, like a large jersey fitting closer to a medium, can still disrupt uniformity.
- Fabric flaws such as pilling, snags, or irregular textures that affect the uniform’s appearance or durability during washing are also major concerns.
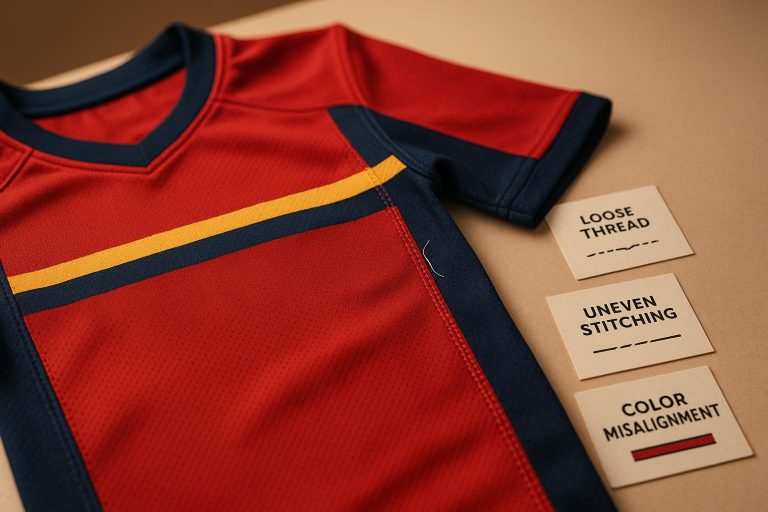
Minor Defects
Minor defects are cosmetic issues that don’t affect performance, safety, or the uniform’s overall appearance. While noted during inspection, these don’t typically justify rejecting the uniform.
- Superficial imperfections like untrimmed threads, slightly uneven stitching, or small variations in stitch density are common examples.
- Slight print misalignments – such as a logo being slightly off-center or text tilted by 1/8 inch – are minor and don’t detract from the overall look.
- Fabric imperfections like small knots, slight texture inconsistencies, or barely noticeable color variations fall into this category.
- Packaging and labeling issues – for example, wrinkled tags, smudged care labels, or folding creases – don’t impact the uniform’s usability.
Minor defects don’t compromise the uniform’s core purposes – protecting athletes, maintaining a professional appearance, and enduring the rigors of sports. Teams often accept uniforms with minor flaws, especially when time constraints or easy fixes are factors.
Step-by-Step Guide to Inspecting and Identifying Defects
At Wooter Apparel, every uniform goes through a detailed quality check to ensure it meets high standards. A thorough inspection process ensures any defects are caught before the uniforms reach your team. Following a structured method helps maintain consistency across inspectors and uniform batches.
Preparation for Inspection
Setting up your workspace correctly is key to spotting defects effectively. Use proper lighting – natural daylight or full-spectrum LED lighting (1,000 lux) – to highlight color inconsistencies and fabric flaws.
Gather the necessary tools for inspection. These include:
- A measuring tape marked in inches for accurate size checks
- A magnifying glass to examine fabric details
- Color reference cards or approved samples for comparison
- A defect classification chart to categorize issues as critical, major, or minor
Use a clean, flat surface large enough to lay out each garment completely. This ensures jerseys and shorts can be inspected without wrinkles obscuring potential defects. Clear the area of any clutter, and make sure the surface is debris-free.
Prepare an inspection checklist tailored to the uniform type. For instance, basketball jerseys may require attention to areas like armhole construction, hem durability, and graphic placement, while football uniforms might have different focus points. Once your workspace and tools are ready, begin the inspection.
Inspection Techniques
With your setup complete, start with a systematic visual and tactile inspection. Begin by visually scanning each piece from about 18 inches away to spot obvious issues like color mismatches, missing graphics, or structural problems. Then, move closer for a detailed look.
Run your hands over the garment to feel for snags, thin spots, or irregular textures, especially in high-stress areas like shoulder seams, side panels, and waistbands, where fabric is more prone to wear and tear.
Examine all seams by gently stretching them to check for gaps or loose threads. Inspect hem stitching for consistency, with athletic wear typically requiring 12 to 14 stitches per inch.
Measure and verify critical dimensions against size specifications, allowing a tolerance of ±0.5 inches. This ensures the uniform fits as intended.
Check graphics and text for alignment, color accuracy, and proper adhesion. Press on printed areas to confirm that sublimated graphics are fully integrated into the fabric and not peeling or raised. Use a color reference sample to ensure team colors match the specifications.
Test all functional components like zippers, snaps, and drawstrings. These should operate smoothly without resistance. Drawstrings should pull evenly without causing fabric bunching.
Documenting Inspection Findings
As soon as you identify a defect, document it immediately to avoid forgetting details or misreporting its location. Use a standardized inspection form that includes fields for defect type, location, severity, and photographic evidence.
Describe defect locations clearly using consistent references, such as "2 inches below the left shoulder seam" or "center chest, 3 inches from the neckline." This level of detail helps production teams address recurring issues efficiently.
Photograph major and critical defects using a digital camera or smartphone. Include a ruler or coin in the photo to provide a sense of scale. Save images with descriptive filenames, such as "Jersey_A_ColorBleed_ChestArea_03152025.jpg", using the MM/DD/YYYY date format.
Create a defect summary sheet for each uniform order, categorizing defects by type and location. This summary can reveal patterns, such as recurring loose stitching at the same seam, which may point to a production issue.
Time-stamp all documentation and include the inspector’s initials for accountability. Digital inspection tools can simplify this process, allowing for real-time photo uploads, automatic time-stamping, and easy defect categorization.
Keep these records for at least 12 months to monitor quality trends and address any customer concerns that may arise after delivery.
sbb-itb-4d95ad3
Criteria and Methods for Classifying Defects
Once defects are identified, the next step is to classify them to ensure quality standards are met. At Wooter Apparel, maintaining consistent classification is key to delivering top-notch uniforms. This process ties directly to earlier inspections, ensuring every defect is thoroughly evaluated.
Defect Classification Criteria
Defects are categorized based on several important factors:
- Severity: This measures how much a defect impacts the uniform. Critical defects make the uniform unwearable or unsafe, like open seams that could tear during use or missing size labels that lead to improper fitting. Major defects affect the look or functionality – think misaligned team logos or significant color mismatches. Minor defects, such as loose threads or small stitching inconsistencies, have minimal impact on appearance or performance.
- Location: The placement of a defect can change its severity. A minor issue in an inconspicuous area might be acceptable, while the same defect in a prominent or high-stress area – like armholes, side seams, or waistbands – could be classified as major.
- Frequency: A single defect might be tolerable, but repeated issues across a batch signal a larger production problem. A recurring defect can elevate its severity classification, as it suggests a systemic issue that needs addressing.
- Functional Impact: Even if a defect isn’t visually obvious, it’s treated more seriously if it affects the uniform’s functionality. For instance, zippers that stick or drawstrings that don’t work properly are prioritized for correction.
- Intended Use: The standards for quality vary depending on the uniform’s purpose. Uniforms for professional teams or televised events demand stricter quality checks compared to those meant for practice or recreational use.
Inspection and Sampling Methods
After defining the classification criteria, reliable inspection and sampling methods help quantify quality. Techniques like AQL sampling and statistical process control are essential for monitoring defect patterns and making process improvements.
Digital tools play a big role here. They capture images of defects, log timestamps, and standardize how defects are categorized. This reduces human error and creates a searchable database to track trends over time.
Regular training and equipment calibration ensure consistent classification across inspections. To get accurate results, inspections are conducted in controlled indoor settings with stable temperature and humidity.
Every defect is documented with precision, creating a clear record that supports ongoing quality improvement.
Best Practices for Quality Control in Custom Sports Uniform Production
Quality control isn’t just about catching defects – it’s about building quality into every step of the production process. At Wooter Apparel, these practices ensure that every custom uniform meets the high expectations of teams across the United States.
Standardized Training for Inspectors
Inspector training is the backbone of effective quality control. Every inspector must know how to distinguish between a critical issue, like a seam failure, and something minor, like a slight thread variation. This is especially important for fully sublimated designs, where precision in color and print alignment is non-negotiable.
Training programs include hands-on practice with sample uniforms that showcase different types of defects. Inspectors also learn to focus on sport-specific requirements – basketball jerseys, for instance, face different stresses than football uniforms, so the inspection process must adapt accordingly. Visual guides outlining acceptable and unacceptable defects ensure consistency, whether it’s a morning or evening shift.
To maintain accuracy, inspectors regularly review borderline cases. For example, if someone repeatedly misclassifies a misaligned logo as a minor issue, targeted training addresses the error. This prevents inconsistencies that could lower quality standards over time.
Cross-training inspectors to evaluate various uniform types is another key strategy. An inspector experienced with baseball uniforms can apply that knowledge when assessing soccer jerseys, leading to more comprehensive evaluations across Wooter Apparel’s diverse product lines. This structured training approach ensures continuous improvements in quality control.
Continuous Improvement in Quality Standards
A skilled inspection team is just the beginning. Continuous improvement is essential to keeping quality standards aligned with evolving needs. Regular reviews of production data and customer feedback help identify recurring issues. For instance, if a specific design element consistently causes problems, standards are adjusted to address the root cause.
Feedback loops between inspectors and production teams are vital. If inspectors notice increased color variation in particular fabric batches, production teams can make adjustments before the problem spreads. This real-time collaboration stops small issues from snowballing into larger ones.
Seasonal reviews also play a role, tailoring quality standards to match customer needs. For example, teams gearing up for championship seasons may demand stricter tolerances compared to those ordering practice gear. Adjusting standards ensures every order meets its intended purpose.
Technology adds another layer of precision. Digital inspection tools track defect trends over time, revealing patterns that might not be obvious from individual reports. This data helps refine processes and identify training needs more effectively.
Beyond internal operations, supplier partnerships are crucial. Collaborating with fabric suppliers and equipment manufacturers helps catch potential quality issues before they even reach production. This ensures consistent material quality and minimizes defect rates across all product types.
Ensuring Customer Satisfaction Through Feedback
Customer feedback is a goldmine for improving quality. It provides real-world insights into how uniforms perform during actual use – something that standard inspections might miss. Feedback from coaches, players, and team managers often highlights areas for improvement.
Post-delivery surveys are a key tool for gathering this feedback. For example, if teams report that warmup jackets don’t hold up to frequent washing or that jersey colors fade too quickly, this information guides updates to production processes and quality standards.
Return analysis offers another layer of insight. Examining returned items helps identify quality failures and prevents similar issues in future orders.
Wooter Apparel also takes a proactive approach by following up with customers during their season. Checking in shows a commitment to quality and provides valuable data on how uniforms are holding up. This builds trust while uncovering any emerging issues.
Customer education is another important piece of the puzzle. By providing clear care instructions for washing, storing, and maintaining uniforms, teams can avoid problems caused by improper handling. This not only extends the life of the uniforms but also boosts overall satisfaction.
Conclusion
After diving into the detailed processes of inspection and defect classification, a few key points stand out. The defect classification system – divided into critical, major, and minor categories – offers a straightforward framework for making consistent and reliable decisions about whether a product passes inspection or requires further attention. This structure ensures teams can confidently assess quality when it matters most.
By implementing this system, manufacturers achieve consistency, reduce disputes, and simplify decisions regarding acceptance, rework, or rejection. It’s a methodical approach that brings predictability and reliability to the production process.
Main Takeaways
- Thorough inspection is the foundation of defect classification. Proper preparation, standardized techniques, and detailed documentation all play a role in meeting customer expectations.
- Defect severity determines classification:
- Critical defects make uniforms unsafe.
- Major defects impact functionality or appearance.
- Minor defects are purely superficial.
Knowing these distinctions allows inspectors to make quick, accurate calls, even during high-pressure production runs.
- Clear communication between buyers and manufacturers is essential. Buyers must define their specific tolerance levels for defects, often using Acceptable Quality Level (AQL) standards. These expectations should be outlined in a detailed Quality Control (QC) checklist, minimizing misunderstandings and disputes later on.
- Regular quality audits and inspections are non-negotiable. These practices uphold quality standards, ensure compliance, and foster continuous improvement. Investing in proper training and feedback loops from customers reduces defect rates while strengthening relationships across teams.
At Wooter Apparel, every uniform undergoes rigorous quality checks from design to delivery. By adhering to these meticulous standards, Wooter Apparel ensures that each product not only meets but exceeds expectations. Every piece is inspected multiple times to catch and resolve any issues before it reaches the customer. This commitment to quality is what sets Wooter Apparel apart.
FAQs
How can customer feedback help improve the quality of custom sports uniforms?
Customer feedback is crucial for improving the quality of custom sports uniforms. It sheds light on important aspects like design preferences, fit, durability, and how well materials perform. By paying attention to what athletes and teams truly want, manufacturers can make specific adjustments that enhance both performance and appearance.
Tools like surveys, reviews, and direct input help uncover trends and common concerns. This enables companies to fine-tune their products to better match customer expectations. The result? Happier customers and stronger loyalty, as teams feel their uniforms are tailored to their unique needs.
What training helps inspectors classify defects in sports uniforms consistently?
To keep defect classification consistent, inspectors need practical training tailored to spotting typical problems in sports uniforms. This training should include hands-on exercises, the use of standardized checklists, and periodic calibration sessions to ensure they stay aligned with established quality standards. Additionally, regular refresher courses and evaluations play a key role in maintaining both accuracy and uniformity during inspections.
How does the placement of a defect on a sports uniform determine if it’s critical, major, or minor?
The location of a defect on a sports uniform is a major factor in determining whether it’s labeled as critical, major, or minor. Defects in highly visible areas like the front, back, or sleeves are often deemed critical or major because they can affect the uniform’s appearance or how it performs during a game. In contrast, flaws in less noticeable spots, such as inner seams or small fabric imperfections, are usually classified as minor.
The classification hinges on how the defect impacts safety, performance, and appearance. Defects that are visible or occur in high-contact areas are more likely to be critical or major, as they can interfere with the uniform’s functionality and overall look on the field.