
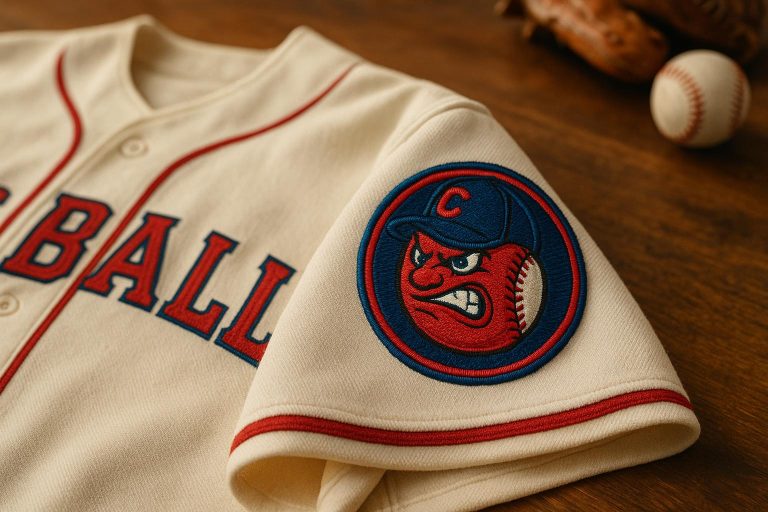
Baseball uniform patches are more than just decorations – they represent team identity, achievements, and shared values. From honoring milestones to supporting causes, these patches tell stories that resonate with players and fans alike. Here’s what you need to know:
- Purpose: Patches commemorate championships, pay tribute to players, and highlight regional pride or sponsorships.
- Types: Common options include embroidered, woven, PVC, leather, and felt patches, each suited to specific needs.
- Customization: Teams can personalize patches with logos, names, colors, and attachment methods like sew-on or iron-on.
- Placement: Popular areas include sleeves, chest, and back panels, with sizes ranging from 2-5 inches.
- Care: Proper washing, air drying, and regular maintenance keep patches vibrant and secure.
Whether you’re designing patches for a Little League team or a professional squad, these small details can make a big impact on team spirit and legacy.
How to Apply the Little League Patch
Types of Baseball Uniform Patches
Patches play a key role in showcasing a team’s history and identity. To choose the perfect design, it’s important to understand the materials, shapes, and customization options available. Baseball uniform patches come in various forms, each tailored to meet specific needs and preferences. Knowing the differences can help teams pick patches that best represent their spirit while holding up to the rigors of the game.
Materials and Construction
The quality of a baseball patch starts with its material and how it’s made. Here’s a breakdown of some popular options:
- Embroidered patches: Made with durable polyester twill, these offer a smooth surface that works well for detailed designs.
- Woven patches: Lightweight, washable, and ideal for intricate text, these patches provide a sleek finish.
- PVC patches: Known for their toughness, these resist peeling, fraying, and staining, making them great for outdoor or heavy-use uniforms.
- Leather patches: Real leather adds durability and water resistance, while faux leather offers a cost-friendly and vegan alternative, though it may peel over time.
- Canvas patches: Built for heavy-duty use, these resist warping and are perfect for demanding conditions.
- Cotton patches: Soft and easy to apply but less durable compared to other materials.
- Felt patches: A good choice for hand-stitched designs, though they’re not ideal for uniforms that require frequent washing.
Common Shapes and Sizes
Baseball patches are designed to be both functional and visually appealing. Common shapes include circles, rectangles, shields, and squares, though many teams opt for custom shapes that match their logos or artwork.
Patch sizes vary depending on their purpose and placement. Here’s a quick guide:
| Patch Type | Approximate Size |
|---|---|
| Sports Patches | 3" |
| Logo Patches | 3" to 3.5" |
| Shoulder/Sleeve Patches | 3" to 5" |
| Mini Patches | 2" to 3" |
When choosing a size, it’s essential to balance the complexity of the design with the space available. A patch should be large enough to ensure the design is clear and legible but not so big that it overwhelms the uniform.
Customization Features
Modern patches offer a wealth of customization options to help teams showcase their identity. Standard sizes (usually 2.5 to 4 inches) provide enough room for logos, names, and numbers, while color customization ensures a seamless match with team uniforms.
- Textured vs. smooth finishes: Embroidered patches create a textured, 3D effect, while woven patches offer a smooth finish that’s perfect for detailed designs.
- Material choices: Teams can select from a variety of materials, including genuine or faux leather, silicone, woven, embroidered, and sublimated patches.
- Attachment methods: Options like iron-on, sew-on, and Velcro backings allow flexibility in how patches are applied and maintained.
For teams planning custom patches, it’s often wise to order a few extras. Bulk pricing usually makes it cost-effective to have spares on hand. These customization features let teams create patches that not only stand out but also perfectly align with their unique identity.
Design and Customization Process
Creating custom baseball patches is all about precision and attention to detail. Once you’ve got a handle on the different patch types and materials, the next step is turning your ideas into standout uniform patches. By understanding the technical requirements and placement guidelines, you can ensure your patches not only look great but also serve their purpose effectively on the field.
Creating the Perfect Design
A strong baseball patch design starts with the essentials: elements that represent your team’s identity. This could mean adapting your team’s logo, including player details like numbers, names, or position abbreviations, and even adding special touches like glow-in-the-dark features or metallic threads. If your logo is complex, simplifying it for smaller sizes is key to maintaining clarity.
Stick to Pantone-matched team colors and bold, open block fonts with a minimum size of 1/8 inch for readability. High contrast between colors also helps with visibility, especially from a distance.
The design process begins with outlining defined shapes, called capture lines, which guide the final colors during production. Spacing and graphic elements should be carefully arranged to ensure the design looks clean and sharp.
When choosing the type of patch – whether embroidered, PVC, woven, chenille, leather, or printed – consider the unique look and durability each option offers. Your final decision should align with your practical needs and aesthetic preferences.
Once your design is ready, it’s time to think about placement and size to make the most of your patch’s impact.
Placement and Sizing
The size of your patch should be determined by the space available on the uniform. Most patches fall within the 3 to 5-inch range, but specific uses might call for something smaller or larger.
Here’s a quick guide to standard patch sizes for different parts of a uniform:
| Uniform Location | Typical Size Range | Purpose |
|---|---|---|
| Front pockets/chest | 2–3 inches | Team identification, small logos |
| Shoulder/sleeve | 3–5 inches | League patches, sponsor logos |
| Back panels | Up to 12 inches | Large team names, numbers |
| Caps/hats | 2–3 inches | Adjusted for curvature |
For example, Little League organizations have specific placement rules. Patches should be positioned 3 inches below the left shoulder seam for raglan sleeves, 1 inch below the left shoulder seam for set-in sleeves, over the left breast for sleeveless uniforms, and 4 inches below the left shoulder seam for umpires wearing set-in sleeves.
The patch’s purpose and location on the uniform also play a big role in determining its size. Smaller patches work well for pockets or chest areas, while medium-sized ones are better suited for sleeves or shoulders. Larger patches are ideal for back panels, especially if they feature detailed designs or need to be visible from a distance.
Getting the proportions right is crucial for a balanced look. The patch should fit the available space without appearing cramped or too small. Testing different sizes with paper templates can help you visualize how the patch will look on the uniform and ensure it complements the overall design.
sbb-itb-4d95ad3
Application and Maintenance of Patches
Getting your custom patches to stay put and look sharp is all about proper application and consistent upkeep. Whether you’re attaching them for the first time or keeping them looking fresh, the method you choose and how you care for your uniforms afterward will make all the difference.
How to Apply Baseball Patches
Iron-On Application is the fastest way to attach patches with adhesive backing. Start by washing and drying your jersey to remove any dirt or wrinkles. Set your iron to the right temperature for your fabric – no steam, just dry heat works best. Place a press cloth over the patch to protect it, then press down firmly for 10–15 seconds.
Sew-On Patches offer a more secure and polished finish. Use thread that matches the patch border or uniform for a seamless look. Before sewing, you can add a little fabric glue around the edges to keep the patch in place and prevent lifting during stitching. Start by securing the corners, then stitch around the entire edge with small, even stitches. For added durability, consider adding a few hand stitches even to iron-on patches.
Combination Method gives you the best of both worlds. Even if you start with an iron-on patch, sewing the edges ensures it stays put through heavy use and frequent washing.
Take your time during application. Make sure your work surface is flat and stable, and carefully position the patch before attaching it – repositioning later can damage both the patch and the uniform. Once attached, proper care will help keep your patches looking great.
Caring for Uniforms with Patches
Once your patches are in place, regular care is key to keeping them vibrant and secure. Turn uniforms inside out before washing to shield patches from direct wear and tear. Use cold water and a gentle cycle, steering clear of bleach, fabric softeners, or harsh detergents that can weaken patch materials and fade colors. Wash uniforms separately – especially from socks – to avoid bacteria transfer and color bleeding.
"Proper patch care ensures that your patches remain vibrant and securely attached, so they continue to make a statement for years to come." – Paddy’s Patches
Air drying is the safest option. If ironing is needed, use a press cloth, keep the heat low, and iron from the back of the garment to avoid direct contact with the patch.
Storage matters too. Keep uniforms out of direct sunlight to prevent fading. Use padded hangers to maintain their shape, and if folding is necessary, fold carefully along seams to avoid creasing the patches. For long-term storage, use acid-free tissue paper to protect the fabric.
Regular Maintenance helps catch small issues before they become major problems. Check patches for loose threads, peeling edges, or fading. Trim stray threads with small scissors, and use fabric glue to reseal any edges that start to lift. If colors fade, fabric markers can help with touch-ups – just test them on a hidden spot first.
Stain Treatment is all about acting quickly. Pre-treat stains right away to stop them from setting. For general stains, gently dab with a mild soap solution and rinse with a clean, damp cloth. For tougher stains on white pants, try a mix of water, vinegar, and baking soda – let it soak, then wash.
Insect Prevention is especially important for stored uniforms. Check regularly for signs of pests, like loose fibers, insect debris, or webbing. If you spot any damage, freezing the garment or consulting a textile conservator can help.
If a patch starts peeling, you can reattach it with a hot iron and a press cloth or add a few extra stitches to keep it secure.
How Wooter Apparel Supports Custom Baseball Patches

Wooter Apparel specializes in creating custom baseball uniforms that seamlessly incorporate patches. With their full-sublimation printing and tailored design options, they provide everything a team needs in one streamlined order.
Custom Patch Integration with Uniforms
Wooter Apparel takes a unique approach to custom patches by using full-sublimation printing. This method embeds patch designs directly into the fabric, ensuring they remain durable and vibrant over time – no peeling or fading to worry about. The result is a polished, unified look that holds up through countless games.
Customization is at the heart of their service. Every detail of a uniform can be tailored to your team’s needs, whether it’s logos, player names, numbers, sponsor patches, or commemorative designs. Their in-house design team collaborates closely with customers, turning creative visions into reality.
For teams that prefer a more traditional touch, Wooter Apparel offers tackle-twill embroidery as an optional add-on for $19.99. This technique creates raised lettering or logos, adding texture and depth to the design. All uniforms are constructed with premium materials like 220gsm Swiss Pique, a 100% polyester fabric known for its durability and moisture-wicking properties.
Pricing is designed to accommodate teams of all sizes. Jerseys range from $24.99 for bulk orders of 500+ to $36.99 for smaller quantities. Full uniform sets start at $52.99 for large orders and go up to $79.99 for smaller team sizes.
This seamless integration of patches and uniforms pairs perfectly with Wooter Apparel’s efficient design and ordering process.
Design and Ordering Process
Getting started with Wooter Apparel is straightforward, thanks to their automated platform and free design services. Teams can choose from existing templates or submit custom ideas at no additional cost.
The process kicks off with direct consultation. Teams can connect via phone, live chat, or email to outline their uniform and patch requirements. Wooter Apparel’s 40+ member team, based in New York City, manages everything from concept creation to final production. Dedicated staff across design, tech, operations, sales, and customer care ensure a smooth experience.
Customer stories highlight the success of this collaborative approach. In March 2025, Sierra’s travel baseball team received uniforms described as "wonderful" and praised for their standout design. Similarly, Shannon’s Circle City Flyers worked with designer Olya to craft uniforms that thrilled the players.
Flexibility is a key part of the design phase. In October 2017, Coach O. noted how Jessica from Wooter Apparel provided extensive support, making numerous revisions to meet their specific needs.
Turnaround times are competitive. Standard orders take 3–4 weeks, while rush orders can be completed in 2–3 weeks, covering everything from design to shipping. Uniforms are produced in factories in China and Pakistan and shipped to teams across the U.S.. With over 1,600 reviews and ratings between 4.8 and 4.9 stars, customers consistently applaud the quality of the uniforms and the attentive service.
For teams looking to bring their ideas to life, Wooter Apparel offers design consultations that help translate concepts into cohesive team identities. Their mix of design expertise, production capabilities, and personalized support makes the process approachable – even for those ordering custom uniforms for the first time.
Conclusion
Uniform patches do much more than decorate jerseys – they help shape identity, celebrate milestones, and establish lasting traditions. Whether you’re showcasing sponsor logos, commemorating championship victories, or simply fostering team unity, the right patches can turn uniforms into powerful symbols of pride.
Choosing the right patch type, material, and application method is crucial for success. For example, embroidered patches are highly durable and ideal for game uniforms, while sublimated patches are better suited for practice jerseys due to their lightweight design. When designing patches, it’s important to simplify intricate logos for smaller sizes and stick to consistent brand colors.
The application method is another key factor. Sew-on patches provide maximum durability, while iron-on patches offer quick and easy application. For added security, a combination of both methods can be used. Ultimately, the right mix of design, application, and maintenance ensures patches play a meaningful role in uniting a team.
Key Takeaways
From our exploration, it’s clear that thoughtfully chosen patches can strengthen team bonds and even enhance performance. Advances in patch technology now offer teams a range of options to meet their uniform needs. For instance, multi-needle embroidery allows for up to 12–15 stitches per millimeter, delivering crisp, detailed designs that stand the test of time. Teams can also select from materials like PVC rubber for hats, chenille for a retro vibe, or classic embroidered styles for a timeless look.
Custom patches are also a cost-effective solution. They provide a polished, professional appearance without the expense of fully custom uniforms, while also boosting brand visibility. Beyond aesthetics, patches create a sense of belonging among players, fostering team spirit and improving morale, which can translate to better on-field performance.
"Custom patches promote team unity by embodying team spirit and shared goals, thereby boosting employee morale and motivation." – Patchesmania
The versatility of patches extends beyond jerseys – they can be used on hats, bags, and other team gear, making them a powerful tool for comprehensive branding. Whether you’re outfitting a youth league or a competitive travel team, patches allow you to craft a distinctive look that reflects your team’s personality while maintaining a professional edge that resonates with players, parents, and even opponents.
With careful planning, high-quality materials, and attention to application methods, patches can elevate your team’s image and legacy. They bring players together, creating memories, traditions, and a shared identity that lasts long after the season ends.
FAQs
What materials are best for baseball uniform patches to handle frequent washing and outdoor wear?
When it comes to baseball uniform patches, the top materials to consider are polyester twill, PVC, nylon, and embroidered polyester threads. These materials are built to last, standing up to regular wear, frequent washing, and outdoor elements without losing their quality.
With these choices, your patches will keep their bold colors and sharp designs intact, game after game, all season long.
What’s the best way to choose the right size and placement for patches on baseball uniforms?
To get the right balance and visibility for patches on baseball uniforms, it’s essential to focus on both the size of the patch and its placement. The sleeves, chest, and back are the most common spots for patches. For sleeve placement, aim to position the patch about 3 inches above the seam. Chest patches typically range between 3 to 4 inches in size, while back patches can vary depending on the overall design.
The patch should be noticeable without overpowering the uniform. Keeping the design proportional to the uniform helps maintain a polished and professional look. It’s also crucial to align the patch placement with the uniform’s layout to ensure everything looks balanced and visually appealing.
What are the advantages of using custom patches instead of fully custom uniforms for cost savings and team branding?
Custom patches are a budget-friendly alternative to investing in fully custom uniforms. They cost less to produce and can be swapped out easily if uniforms get damaged or need updates. Instead of buying entirely new uniforms, you can simply add or replace patches, which helps save money in the long run.
When it comes to team branding, patches offer a lot of flexibility. Teams can update their look or introduce new design elements without overhauling the entire uniform. This not only keeps expenses under control but also ensures the team’s identity stays consistent. Custom patches strike a great balance between style, branding, and staying on budget.