
When designing team uniforms, aligning names and numbers properly is critical for both aesthetics and functionality. Misaligned or hard-to-read numbers can disrupt gameplay, cause officiating errors, and reflect poorly on the team’s professionalism. Here’s a quick breakdown of what matters most:
- Placement: Names should be 1–1.5 inches above the numbers, which are positioned 2–4 inches below the collar. Both should be horizontally centered and parallel to the jersey hemline.
- Size Guidelines: Use standard measurements based on age group and sport. For example, back numbers are typically 6–10 inches tall, while names are 1.5–2 inches.
- Readability: Choose high-contrast colors and simple, block-style fonts to ensure visibility from a distance.
- League Compliance: Verify league-specific rules, such as digit restrictions or size requirements, to avoid penalties.
- Production Tips: Use digital templates with alignment guides, scale designs consistently across sizes, and perform test prints to catch errors early.
Key Takeaway: Proper alignment ensures clarity, compliance, and a professional appearance. Double-check all details, from roster accuracy to final production, to avoid costly mistakes. Tools like digital templates and centralized data systems streamline the process and minimize errors.
Pre-Design Checklist for Name and Number Placement
Verify Team Roster and Numbers
Start by securing a finalized team roster with correctly spelled names and confirmed numbers as soon as possible. This early step allows enough time to double-check every detail before production begins.
Double-check spellings and ensure player numbers align with league position requirements. For instance, in football, assigning a number outside the approved range for a position can lead to penalties or player ineligibility. As Dr. Tee’s Design & Screen Printing explains:
"Assigning a player a number outside their position’s approved range can result in a penalty or the player being ruled ineligible for that down."
Make sure all numbers comply with league rules and digit restrictions. Cross-reference the roster against the current rulebook for the season to avoid any issues. Once verified, select design elements that ensure the numbers are easy to read during gameplay.
Choose Fonts, Sizes, and Colors
The font you choose plays a key role in readability. Most leagues prefer standard block-style fonts and may reject decorative or outlined designs that make numbers harder to read.
Size requirements depend on the sport and the age group of the players. Refer to standard dimensions to ensure compliance. Using jersey sizing kits can help confirm these measurements for your specific team. For colors, focus on creating high contrast between the numbers and the jersey fabric. This helps officials and scorekeepers easily identify players during the game.
Once the design elements are finalized, it’s time to establish placement rules.
Set Alignment Rules and Margins
Define exact measurements before creating templates. For the back of the jersey, center the number horizontally and maintain a consistent vertical margin – typically 3 inches from the collar to the top of the name or number. Player names are usually positioned directly above the back number, with letters measuring 1.5 to 2 inches in height.
Front numbers are generally centered on the jersey’s front panel, though some designs may place them on the left chest. Whatever placement you decide on, document it clearly. As Dr. Tee’s Design & Screen Printing highlights:
"Consistent placement across all jerseys in a set makes your uniforms look professional and prevents numbers from drifting toward the shoulder on some shirts and toward the waist on others."
If sleeve numbers are permitted by your league, they should match the front number’s font and style. Sleeve numbers typically range from 2 to 4 inches in height, depending on the age group. By setting these rules in writing before starting the design process, you ensure all jerseys in the set maintain a polished and consistent appearance.
sbb-itb-4d95ad3
File Setup and Production Checklist
Build Digital Templates with Alignment Guides
After documenting your placement rules, it’s time to bring them to life in digital templates. Start by adding a vertical centerline to your jersey template. This ensures names and numbers are perfectly centered every time.
Set fixed vertical spacings as well. For example, names are usually placed 1 to 1.5 inches above the back number. Standard heights for names range from 2–3 inches, while numbers typically measure 6–8 inches, depending on league specifications. Lock these measurements into your template to maintain consistency.
Always work with vector-based file formats like AI, SVG, or PDF. These formats allow your designs to scale without losing clarity – essential for producing clean artwork across sizes, from Youth Small to Adult 3XL. If vectors aren’t an option, ensure PNG files are at least 1,000 pixels wide to avoid blurry prints.
"Custom uniform orders do not fail in production. They fail in planning." – Wooter
With your template ready, confirm that every design element resizes properly.
Scale Elements Correctly Across Sizes
Every design element must stay proportional and easy to read across all sizes. Stick to the standard measurements mentioned earlier, but adjust as needed based on the specific size chart for each product. Keep in mind that fit and panel dimensions can vary.
For numbers, always position them 2 to 4 inches below the collar to ensure they remain in the upper half of the back panel. Proper scaling ensures that the final uniforms look consistent and professional, no matter the size.
Once you’re confident in the scaling, move on to test prints and mockup approvals.
Run Test Prints and Get Mockup Approvals
Before giving the green light, carefully review a proof for key details like spelling, spacing, roster numbers, font accuracy, color contrast, and logo clarity. Assign one person to oversee the approval process. Relying on group feedback can lead to errors or confusion over versions.
Keep in mind that production timelines start from the date mockups are approved – not from the initial order discussion. Clear and prompt approvals are crucial to ensure the uniforms are ready before game day.
Physical Alignment Checklist During Production
After digital approval, getting the placement right during production is crucial to avoid expensive errors. These checks ensure everything is aligned before it’s too late to fix.
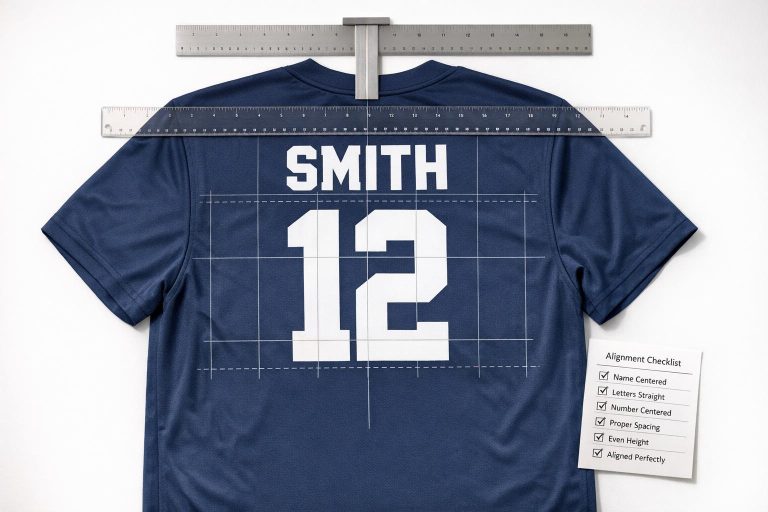
Back Name and Number Checks
Start by folding each jersey along its vertical centerline. This fold serves as the easiest and most reliable way to center both the name and number on the back panel.
The number should begin 2 to 4 inches below the collar and stay in the upper half of the back panel. Player names go directly above the number, centered, with letter heights of 2 to 3 inches for high school and adult sizes, or 1.5 to 2 inches for youth jerseys. Maintain a gap of 1 to 1.5 inches between the bottom of the name and the top of the number across all jerseys.
Use a measuring tape and chalk to mark reference points before applying ink or heat. It’s also essential to ensure that both the name and number are aligned parallel to the bottom hem. Even a slight tilt will stand out when jerseys are compared side by side.
Finally, check the front numbers to ensure they meet sport-specific placement standards.
Front Number Placement Check
Front numbers aren’t positioned the same way for every sport. Placement varies depending on the game, so confirm these details and get a custom quote before production to avoid costly reprints.
| Sport | Front Number Placement | Standard Front Height |
|---|---|---|
| Basketball | Center chest | 4–6 inches |
| Football | Center chest | 4–8 inches |
| Soccer | Right chest | 3–4 inches |
| Baseball | Left chest (optional) | Varies by league |
Source:
For centered numbers, use the vertical center fold as your guide. For numbers positioned on the chest (like in soccer or baseball), measure consistently from the side seam and shoulder seam on every jersey. Use a pressing pillow under uneven areas near seams to ensure even pressure and avoid distortion during application.
Sample and Consistency Checks
Before finalizing production, select a sample jersey from each size, lay them side by side, and confirm that name and number placements are consistent. What looks accurate on an Adult Medium can appear off on a Youth Small or Adult 3XL if panel-size adjustments weren’t made.
Double-check every jersey against your roster spreadsheet to ensure the correct name matches the correct number. This is your last chance to catch a mismatch before packaging. Fixing it now only takes minutes – catching it after delivery is a far bigger issue.
Final Quality Control Checklist Before Delivery

Jersey Name & Number Size Standards by Sport and Age Group
After completing alignment and scaling checks, this final QC step ensures every jersey meets strict standards for consistency and compliance. This stage helps catch minor issues before delivery, avoiding expensive fixes later.
Check Visual Uniformity and Readability
Lay all jerseys flat, side by side, to confirm that names are straight, numbers are centered, and vertical spacing is consistent across all sizes. The goal is to ensure the entire set appears as if it was created from a single template.
Pay extra attention to contrast. A number that looks fine on a screen might blend into a dark sublimated pattern under gym lighting.
Step back 10–15 feet to check the legibility of names and numbers. This simulates the view of officials and scorekeepers from the sideline. If any detail is hard to read from this distance, it needs to be fixed before shipping.
Verify That Every Jersey Complies with League Regulations
Cross-check each jersey against the league’s sizing requirements. Use the table below for quick reference:
| Location | Youth Standard Height | High School/Adult Standard Height |
|---|---|---|
| Front Number | 4 inches | 6 inches |
| Back Number | 6 inches | 8–10 inches |
| Sleeve Number | 2–3 inches | 4 inches |
| Player Names | 1.5 inches | 2 inches |
For NFHS football, front numbers must be at least 8 inches tall, while back numbers must be at least 10 inches. In high school basketball, front numbers must measure at least 6 inches, with back numbers at least 8 inches. Additionally, flag any basketball jerseys using digits 6 through 9 – NFHS rules limit numbers to combinations of 0 through 5 for easier signaling of fouls.
"Numbers that are difficult to read slow down official decisions and increase the chance of incorrect calls being made against your players." – Dr. Tee’s Design & Screen Printing
These checks ensure that the jerseys meet both design and league-specific standards.
Get Customer Approval and Prepare for Reorders
Once uniformity and compliance are verified, conduct a final customer review. Compare each jersey to the latest approved mockup, checking font, logo placement, name spelling, and number assignment. Assign one person to handle this final review since group checks often miss details.
After getting customer approval, save the full specification file. This should include vector art files (AI, SVG, or PDF), font names, color codes, and exact placement measurements. These files make future reorders seamless, ensuring the next batch matches the original .
Conclusion
Reviewing these checklists ensures everything flows smoothly, from the initial design phase to final production.
Key Takeaways
Getting names and numbers right on team uniforms isn’t just about appearance – it’s about ensuring clarity, meeting regulations, and maintaining professionalism. To stay on track, focus on three critical steps: finalize the roster and size details, conduct a thorough proof review before approval, and confirm production quantities and delivery timelines before moving forward.
Catching errors early can save both time and money. A simple mistake like a misspelled name or a misaligned number caught during the mockup stage prevents costly reorders. Tools like vector files, standardized roster sheets, and having a single point of approval help streamline the process and minimize errors.
How Wooter Apparel Simplifies the Process

Wooter Apparel takes these essentials and simplifies them further with a structured, proof-based workflow. Their design team creates and approves mockups that align perfectly with your team’s colors, logos, and specific notes.
The company’s UniformOS platform centralizes all player data – names, numbers, and sizes – into one organized system, reducing the risk of mistakes caused by scattered information. Alongside features like standardized Excel roster sheets, Pantone color matching, and a dedicated quality assurance test after stitching, their approach ensures consistent results across all sizes.
"Approval is the point where your order moves forward confidently. If you have a deadline, approvals are the biggest lever you control." – Wooter
With their efficient system and attention to detail, Wooter ensures that what you approve on screen is exactly what you receive. Confidence in the process means teams can focus on the game, not the gear.
FAQs
How do I adjust placement for different jersey sizes?
When adjusting designs for various jersey sizes, it’s important to maintain consistent visual proportions. For youth jerseys, scale the height of letters and numbers proportionally – for instance, letters might be 2 inches tall, while numbers range from 4 to 8 inches. On adult jerseys, larger elements are common, such as letters measuring 2.5 to 3 inches in height and numbers between 8 and 12 inches.
To ensure proper alignment, use key reference points like the armhole-to-armhole distance or the garment’s center line. These guides help maintain horizontal alignment and uniformity across all sizes.
What’s the fastest way to catch name/number errors before printing?
The fastest way to spot name and number mistakes is by carefully reviewing a full-scale, print-ready digital mockup. Use a proof checklist to double-check details like spelling, capitalization, roster numbers, font style and size, contrast, and placement. Additionally, creating physical samples in key sizes – such as youth medium, adult medium, and 2XL – and photographing them on players or mannequins can help identify scaling or alignment problems. Always compare these details against your team roster before moving forward with production.
Which league rules most often cause uniform reprints?
Uniform reprints often happen because teams fail to follow league rules regarding number size, placement, and visibility. Leagues usually have strict guidelines for things like number height, font style, and color contrast to make sure players can be easily identified. Wooter Apparel helps teams steer clear of these problems by making sure all custom designs align with league standards before production. This proactive approach saves teams from penalties and the expense of replacing uniforms.